Quick Answer
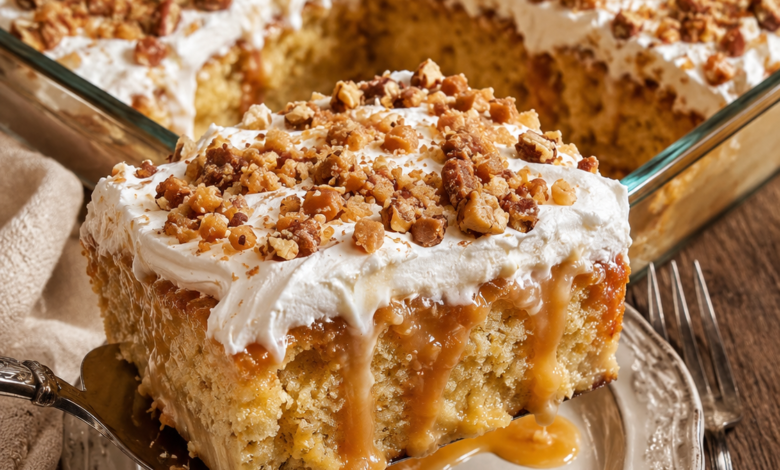
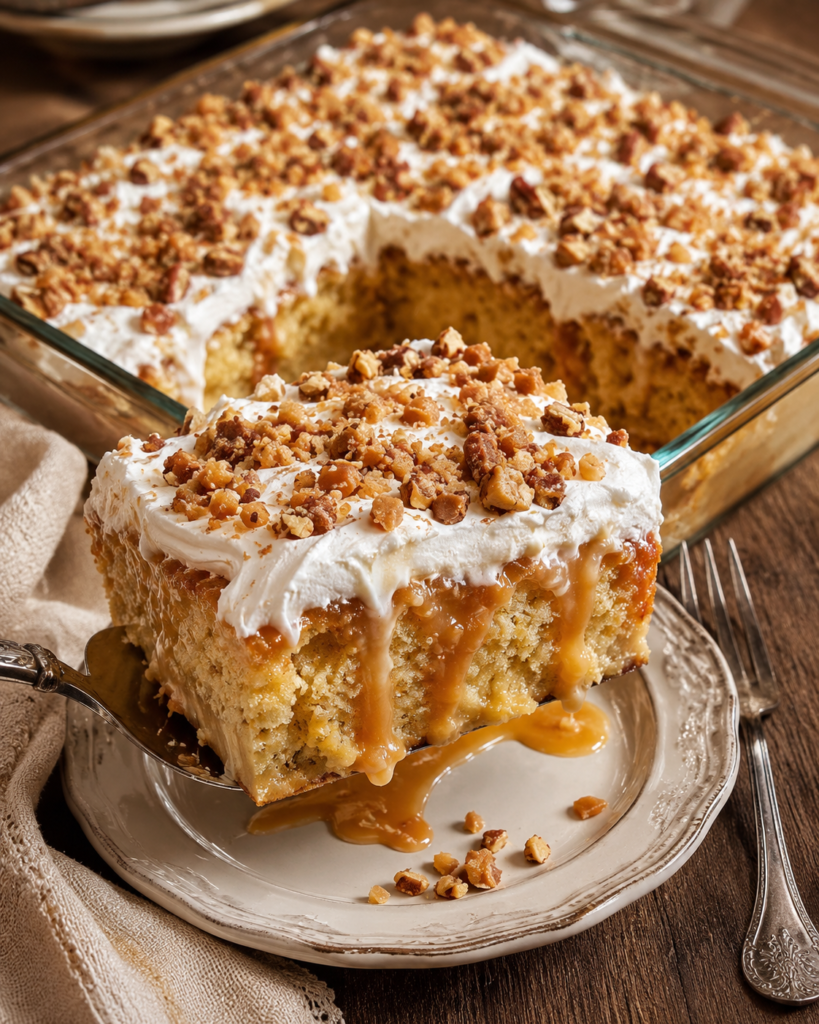
Toffee Butterscotch Poke Cake is a soft vanilla sheet cake baked in a 9×13-inch pan, poked with holes while still warm, then soaked with a rich butterscotch mixture. After chilling, it’s topped with a thick layer of homemade whipped cream, crunchy toffee bits, and toasted pecans. This version stays exceptionally moist, slices cleanly, and is perfect for holidays, potlucks, birthdays, or any gathering where an easy make-ahead dessert is welcome.
Toffee Butterscotch Poke Cake
Few desserts disappear from the table as quickly as a good poke cake. The combination of a light vanilla cake and a rich filling creates a texture that’s difficult to achieve with a traditional frosted cake. Every bite stays soft and flavorful because the filling is absorbed throughout the cake instead of sitting only on top.
This Toffee Butterscotch Poke Cake takes that idea a step further by combining homemade vanilla cake with a warm butterscotch soak, a stabilized whipped topping, and a generous sprinkle of buttery toffee bits and toasted pecans. The result is rich without feeling heavy, making it just as suitable for a holiday dessert as it is for a casual weekend dinner.
One of the biggest advantages of this recipe is that it’s prepared ahead of time. As the cake chills, the butterscotch filling settles into every poke hole, giving the crumb an incredibly moist texture while making slicing easier the next day. If you enjoy desserts that improve after a few hours in the refrigerator, this recipe is an excellent choice.
If you’re looking for more crowd-pleasing desserts, be sure to visit our Lemon Cream Cheese Pound Cake (Moist & Dense) for more make-ahead favorites.
Why This Recipe Works
Many poke cake recipes rely on boxed cake mixes and frozen whipped topping. While those shortcuts are convenient, making the cake from scratch gives you much better control over flavor, texture, and moisture.
Here’s why this recipe consistently produces excellent results:
A Tender Homemade Vanilla Cake
The batter combines butter, sour cream, and whole milk to create a soft, fine crumb that’s sturdy enough to absorb the filling without becoming mushy. The cake stays light while remaining strong enough to hold clean slices.
Warm Butterscotch Filling
Pouring the butterscotch mixture over the warm cake allows it to flow naturally into every hole. The sweetened condensed milk adds richness while helping the filling stay silky instead of becoming watery.
Stabilized Whipped Topping
Mascarpone cheese gives the whipped cream extra structure without making it heavy. The topping remains fluffy for days in the refrigerator and doesn’t collapse or become runny.
Toasted Pecans Add Contrast
The cake is soft and creamy, so adding toasted pecans introduces a pleasant crunch that balances every bite. Toasting also deepens the nutty flavor without adding extra ingredients.
Make-Ahead Friendly
This dessert actually improves after chilling overnight. The flavors blend together, the filling fully soaks into the cake, and the slices become cleaner and easier to serve.
Recipe Summary
| Prep Time | 25 minutes |
| Bake Time | 30–35 minutes |
| Cooling Time | 1 hour |
| Chilling Time | 2 hours (overnight recommended) |
| Total Time | About 4 hours |
| Servings | 15 |
| Course | Dessert |
| Cuisine | American |
| Difficulty | Easy |
| Estimated Calories | Approximately 445 per serving |
Ingredients
For the Vanilla Cake
- 2½ cups all-purpose flour
- 2 teaspoons baking powder
- ½ teaspoon baking soda
- ½ teaspoon fine salt
- ¾ cup unsalted butter, softened
- 1¾ cups granulated sugar
- 4 large eggs, room temperature
- 1 tablespoon pure vanilla extract
- 1 cup whole milk
- ½ cup sour cream
For the Butterscotch Filling
- 2 (11-ounce) jars butterscotch ice cream topping
- 1 (14-ounce) can sweetened condensed milk
- 2 tablespoons heavy cream
- ½ teaspoon fine sea salt
For the Whipped Topping
- 2 cups cold heavy whipping cream
- ¼ cup powdered sugar
- 1 teaspoon vanilla extract
- 8 ounces mascarpone cheese, softened
For the Crunchy Topping
- 1 cup Heath toffee bits
- ¾ cup toasted pecans, finely chopped
- Pinch of flaky sea salt (optional)
Ingredient Notes
A few simple preparation steps help ensure the finished cake has the same texture and appearance as the recipe photos.
Butter
Use softened unsalted butter so it creams properly with the sugar. Proper creaming creates a lighter cake with a finer crumb.
Eggs
Room-temperature eggs blend more easily into the batter and help the cake bake evenly.
Sour Cream
Full-fat sour cream provides moisture and richness while keeping the cake tender even after it absorbs the butterscotch filling.
Butterscotch Topping
Choose a thick but pourable butterscotch topping. Warming it slightly before pouring helps it soak evenly into the cake.
Mascarpone Cheese
Mascarpone stabilizes the whipped cream naturally, allowing it to stay fluffy much longer than whipped cream alone.
Toasted Pecans
Toast the pecans for a few minutes before chopping. This simple step adds noticeable depth of flavor and keeps the topping crisp.
Equipment
You’ll only need a few standard kitchen tools for this recipe:
- 9×13-inch glass baking dish
- Stand mixer or hand mixer
- Large and medium mixing bowls
- Measuring cups and measuring spoons
- Rubber spatula
- Balloon whisk
- Cooling rack
- Wooden spoon handle or thick skewer for poking the cake
- Offset spatula for spreading the whipped topping
- Sharp chef’s knife and cutting board for chopping pecans
The glass baking dish is especially helpful because it retains heat evenly and makes it easy to see when the butterscotch filling has soaked into the cake.
How to Make Toffee Butterscotch Poke Cake
This recipe comes together in simple stages. Baking the cake from scratch creates a tender base, while the warm butterscotch filling gives every bite its signature rich flavor and incredibly moist texture. Don’t rush the cooling and chilling time—those steps make the biggest difference in the finished dessert.
Step 1: Prepare the Oven and Baking Dish
Preheat your oven to 350°F (175°C).
Lightly grease a 9×13-inch glass baking dish with butter or nonstick baking spray. If desired, dust it lightly with flour and tap out any excess.
Why this matters:
An evenly greased pan helps the cake release cleanly and promotes even browning around the edges.
What success looks like:
The baking dish should have a thin, even coating with no heavy pools of grease.
Step 2: Combine the Dry Ingredients
In a medium mixing bowl, whisk together:
- 2½ cups all-purpose flour
- 2 teaspoons baking powder
- ½ teaspoon baking soda
- ½ teaspoon fine salt
Whisk for about 30 seconds to distribute the leavening evenly.
Why this matters:
Evenly mixed dry ingredients help the cake rise consistently without dense pockets.
Visual cue:
The mixture should have a uniform color with no visible streaks of baking powder or baking soda.
Step 3: Cream the Butter and Sugar
In a large mixing bowl, beat the softened butter on medium speed until smooth and creamy, about 2 minutes.
Gradually add the granulated sugar while mixing. Continue beating for another 3 to 4 minutes until the mixture becomes pale, light, and noticeably fluffy.
Why this matters:
Creaming incorporates tiny air bubbles that help create a lighter cake with a soft, even crumb.
Visual cue:
The mixture should nearly double in volume and look light in color.
Warning sign:
If the butter is still cold, the mixture will look lumpy instead of smooth.
Step 4: Add the Eggs and Vanilla
Add the eggs one at a time, beating well after each addition.
Mix in the vanilla extract until fully incorporated.
Scrape down the sides of the bowl if needed.
Why this matters:
Adding the eggs gradually helps create a smooth batter and prevents separation.
Visual cue:
The batter should appear glossy, creamy, and well combined.
Step 5: Finish the Cake Batter
Add one-third of the flour mixture to the butter mixture.
Mix on low speed.
Add half of the whole milk.
Repeat the process until all the flour and milk have been incorporated.
Finally, gently fold in the sour cream until no streaks remain.
Stop mixing as soon as everything is combined.
Why this matters:
Overmixing develops too much gluten, resulting in a tougher cake.
Visual cue:
The batter should be thick, silky, and spread easily without being runny.
Step 6: Bake the Cake
Spread the batter evenly into the prepared baking dish.
Bake for 30 to 35 minutes.
Rotate the pan halfway through baking if your oven has hot spots.
The cake is ready when:
- the top is lightly golden
- the center springs back when gently pressed
- a toothpick inserted into the center comes out with a few moist crumbs
Avoid:
Waiting until the toothpick comes out completely dry, as this usually means the cake has been overbaked.
Step 7: Cool Slightly and Poke the Cake
Allow the cake to cool for about 10 minutes.
While it’s still warm, use the handle of a wooden spoon or a thick skewer to poke holes across the surface about 1 inch apart.
Push each hole almost to the bottom without piercing through the pan.
Why this matters:
Larger holes allow the butterscotch mixture to soak deep into the cake instead of remaining only on the surface.
Visual cue:
The holes should remain open and evenly spaced across the cake.
Step 8: Prepare the Butterscotch Filling
In a saucepan over low heat, combine:
- butterscotch topping
- sweetened condensed milk
- heavy cream
- sea salt
Heat gently while stirring until the mixture is completely smooth and pourable.
Do not allow it to boil.
Why this matters:
Gentle heating creates a silky filling that absorbs evenly into the cake.
Visual cue:
The sauce should coat the back of a spoon while still flowing easily.
Step 9: Pour the Filling
Slowly pour the warm butterscotch mixture over the warm cake.
Work in several passes instead of pouring it all at once.
Pause briefly between pours to give the cake time to absorb the filling.
Use an offset spatula to guide the sauce toward any dry areas.
Why this matters:
Pouring gradually helps every poke hole fill evenly, producing the rich, moist texture that makes poke cake so popular.
Visual cue:
Most of the sauce should disappear into the cake within a minute or two.
Step 10: Cool Completely and Chill
Let the cake cool completely at room temperature.
Cover and refrigerate for at least 2 hours, though overnight produces the best flavor and texture.
Why this matters:
The chilling time allows the filling to distribute evenly while firming the cake for clean slices.
Visual cue:
The surface should no longer appear glossy or wet.
Step 11: Prepare the Whipped Topping
Beat the mascarpone cheese until smooth.
In a separate bowl, whip the cold heavy cream with the powdered sugar and vanilla until medium-stiff peaks form.
Gently fold the whipped cream into the mascarpone using a rubber spatula.
Why this matters:
Folding keeps the topping light while the mascarpone provides stability.
Visual cue:
The topping should hold soft peaks without looking grainy.
Warning sign:
If the mixture becomes stiff and curdled, it has been overwhipped.
Step 12: Frost the Cake
Spread the whipped topping over the chilled cake in a generous, even layer.
Instead of smoothing it perfectly, create soft swirls and gentle peaks with the spatula.
Why this matters:
The rustic texture gives the finished dessert the homemade appearance shown in the photos.
Step 13: Add the Crunchy Topping
Sprinkle the chopped toasted pecans evenly over the whipped topping.
Scatter the toffee bits generously across the entire cake.
Finish with a light pinch of flaky sea salt if desired.
Press very lightly so the toppings adhere without sinking into the whipped cream.
Visual cue:
Every slice should contain a balanced mix of whipped topping, pecans, and toffee bits.
Step 14: Slice and Serve
Use a sharp knife wiped clean between cuts.
Lift each slice carefully with a wide cake server.
For an extra-special presentation, drizzle a spoonful of warm butterscotch sauce over each serving just before serving.
The finished cake should have:
- a soft, tender vanilla crumb
- rich butterscotch flavor throughout
- fluffy whipped topping
- crunchy toffee pieces
- toasted pecans in every bite
Chef Tips
These practical tips will help you get consistently great results every time you make this recipe.
- Warm the butterscotch filling slightly before pouring. It flows into the poke holes more easily and distributes more evenly throughout the cake.
- Use room-temperature ingredients for the cake batter. Butter, eggs, milk, and sour cream blend together more smoothly and create a finer crumb.
- Toast the pecans before chopping them. Five to eight minutes in a 350°F oven deepens their flavor and keeps them crisp against the creamy topping.
- Don’t skip the overnight chill if time allows. The cake becomes even more moist, and the flavors meld beautifully.
- Fold the whipped cream gently into the mascarpone. Stirring aggressively will deflate the mixture and produce a heavier topping.
- Wipe your knife between slices. A clean blade produces neat layers and keeps the whipped topping looking fresh.
- Reserve a small handful of toffee bits. Sprinkle them over each slice just before serving to maintain their crunch.
- For the richest presentation, warm a little extra butterscotch sauce and drizzle it over individual servings instead of covering the entire cake in advance. This keeps the topping attractive while adding extra flavor when served.
Common Mistakes to Avoid
Even simple desserts can run into problems if a few key steps are overlooked. Here are the most common issues and how to avoid them.
1. Overbaking the Cake
What happens:
The cake becomes dry and doesn’t absorb the butterscotch filling properly.
Why it happens:
The cake stays in the oven too long or the oven runs hotter than expected.
How to avoid it:
Begin checking for doneness around the 30-minute mark. A toothpick should come out with a few moist crumbs, not completely dry.
How to fix it:
Pour the filling over the cake while it’s still warm. The extra moisture can help improve a slightly overbaked cake.
2. Poking Holes That Are Too Small
What happens:
Most of the filling sits on top instead of soaking into the cake.
Why it happens:
A toothpick or skewer that’s too thin doesn’t create enough space.
How to avoid it:
Use the handle of a wooden spoon or a thick dowel to create evenly spaced holes about 1 inch apart.
How to fix it:
If you notice the filling isn’t soaking in, carefully enlarge the holes before adding the remaining sauce.
3. Pouring Cold Filling Over the Cake
What happens:
The sauce stays thick and doesn’t spread evenly.
Why it happens:
Cold butterscotch topping doesn’t flow into the cake.
How to avoid it:
Warm the filling gently until it’s smooth and pourable.
How to fix it:
If you’ve already started, warm the remaining sauce and pour it slowly over any dry areas.
4. Frosting the Cake Before It’s Fully Chilled
What happens:
The whipped topping melts or slides across the surface.
Why it happens:
The cake is still releasing heat.
How to avoid it:
Cool the cake completely, then refrigerate it before adding the topping.
How to fix it:
Remove the topping if possible, chill the cake thoroughly, then reapply fresh whipped cream.
5. Overwhipping the Cream
What happens:
The topping becomes grainy or buttery instead of smooth.
Why it happens:
The cream is whipped beyond medium-stiff peaks.
How to avoid it:
Stop mixing as soon as the cream holds soft, stable peaks.
How to fix it:
If only slightly overwhipped, fold in a tablespoon or two of cold heavy cream by hand.
6. Skipping the Chilling Time
What happens:
The cake tastes good but lacks the rich, evenly moist texture that makes poke cakes special.
Why it happens:
The filling hasn’t had enough time to distribute throughout the cake.
How to avoid it:
Refrigerate the cake for at least 2 hours, or overnight for the best results.
7. Adding the Toffee Too Early
What happens:
The crunchy topping softens before serving.
Why it happens:
The toffee absorbs moisture from the whipped topping.
How to avoid it:
For maximum crunch, reserve a small amount of toffee bits and sprinkle them over each slice just before serving.
Variations
One of the best things about this recipe is how easily it can be customized while keeping the same moist, creamy texture.
Salted Caramel Version
Replace the butterscotch topping with salted caramel sauce and increase the flaky sea salt slightly. The cake will have a deeper caramel flavor with a subtle sweet-and-salty finish.
Chocolate Toffee Poke Cake
Replace ½ cup of the flour with unsweetened cocoa powder and use chocolate fudge sauce alongside the butterscotch filling. Finish with mini chocolate chips for even more texture.
Holiday Spice Version
Add ½ teaspoon cinnamon and a pinch of nutmeg to the cake batter. These warm spices pair beautifully with the butterscotch and toasted pecans without overpowering the dessert.
Nut-Free Version
Simply omit the pecans and increase the amount of toffee bits. The cake will still have plenty of crunch while remaining suitable for guests with tree nut allergies.
Shortcut Version
Pressed for time? Substitute your favorite vanilla cake mix for the homemade cake layer. Continue with the homemade filling and whipped topping for a dessert that still tastes rich and homemade.
Storage Instructions
This dessert stores exceptionally well, making it ideal for preparing ahead.
Room Temperature
Because of the whipped topping, don’t leave the cake at room temperature for longer than 2 hours.
Refrigerator
Cover the baking dish tightly with plastic wrap or an airtight lid.
The cake will stay fresh for up to 4 days.
In fact, many people prefer the flavor on the second day because the butterscotch has fully soaked into the cake.
Freezer
Freeze individual slices or the entire cake without the final garnish if possible.
Wrap tightly with plastic wrap followed by aluminum foil.
Freeze for up to 2 months.
Thaw overnight in the refrigerator before serving.
Best Storage Container
A covered 9×13-inch cake carrier or an airtight baking dish helps prevent the whipped topping from absorbing refrigerator odors and keeps the cake from drying out.
Quality Notes
The whipped topping remains stable for several days thanks to the mascarpone cheese. The only ingredient that gradually softens is the toffee topping, so adding a fresh sprinkle before serving helps restore its crunch.
How to Reheat
Unlike many cakes, this dessert is intended to be served cold or lightly chilled.
If you prefer a softer texture, remove an individual slice from the refrigerator and let it sit at room temperature for 10 to 15 minutes before serving.
For an extra indulgent touch, warm a spoonful of butterscotch sauce in the microwave for about 10 seconds and drizzle it over the chilled slice.
Avoid microwaving the entire cake, as the whipped topping may melt and lose its light texture.
Make-Ahead Instructions
This recipe is perfect for making in advance.
One Day Ahead
Bake the cake, prepare the butterscotch filling, and let the cake chill overnight after adding the filling.
The next day, prepare the whipped topping and finish decorating with the toffee bits and toasted pecans shortly before serving.
Two Days Ahead
The fully assembled cake can be refrigerated for up to 48 hours before serving.
For the freshest presentation, reserve a handful of toffee bits to sprinkle over the top just before bringing the cake to the table.
For Parties and Potlucks
Transport the cake in the same baking dish with a tightly fitting lid or cake carrier.
Keep it refrigerated until shortly before serving to maintain the whipped topping’s texture.
Serving Suggestions
This rich dessert pairs beautifully with drinks and lighter accompaniments that balance its sweet butterscotch flavor.
Drinks
- Freshly brewed coffee
- Espresso
- Hot caramel latte
- Cold brew coffee
- Black tea
- Chai tea
- Whole milk
Ice Cream
- Vanilla bean
- Butter pecan
- Salted caramel
- Cinnamon ice cream
Fresh Fruit
- Fresh strawberries
- Raspberries
- Sliced bananas
- Apple slices
Their natural acidity provides a refreshing contrast to the sweet butterscotch.
Extra Toppings
Serve each slice with:
- warm butterscotch drizzle
- extra toasted pecans
- additional toffee bits
- a small dollop of freshly whipped cream
- a light sprinkle of flaky sea salt
These finishing touches add flavor, texture, and visual appeal without overwhelming the dessert.
Frequently Asked Questions
Can I make Toffee Butterscotch Poke Cake a day ahead?
Yes. In fact, this cake tastes even better after chilling overnight. The extra time allows the butterscotch filling to soak evenly into the cake, creating a richer flavor and a softer, more consistent texture.
Can I freeze this cake?
Yes. Wrap individual slices or the entire cake tightly and freeze for up to 2 months. Thaw overnight in the refrigerator before serving. For the best texture, add a fresh sprinkle of toffee bits after thawing.
Can I use a boxed cake mix instead of making the cake from scratch?
Absolutely. A vanilla or butter cake mix works well if you’re short on time. The homemade butterscotch filling and whipped topping will still give the finished dessert a homemade taste and appearance.
Why didn’t my butterscotch filling soak into the cake?
The most common reasons are that the holes were too small, the filling wasn’t warm enough, or the cake cooled completely before the filling was added. Use a wooden spoon handle to make larger holes and pour the warm filling over a still-warm cake.
Can I substitute Cool Whip for homemade whipped cream?
Yes. If convenience is your priority, an 8-ounce container of thawed whipped topping can replace the homemade whipped cream. However, the mascarpone-stabilized whipped cream provides a fresher flavor and a richer texture.
How do I keep the toffee topping crunchy?
Reserve a small portion of the toffee bits and sprinkle them over each slice just before serving. This prevents them from softening as they sit on the whipped topping.
Can I make this dessert without pecans?
Yes. Simply omit the pecans or replace them with additional toffee bits. The cake will still have plenty of flavor and texture.
How long does the cake stay fresh?
Stored in the refrigerator in a covered container, the cake will stay fresh for up to 4 days. The flavor often improves after the first day as the butterscotch continues to infuse the cake.
Can I use homemade butterscotch sauce?
Yes. Homemade butterscotch sauce works beautifully as long as it has a smooth, pourable consistency. Warm it gently before pouring so it flows easily into the poke holes.
Key Takeaways
- A warm butterscotch filling poured over a warm cake creates an exceptionally moist crumb.
- Chilling the cake overnight improves both flavor and texture, making cleaner slices.
- Mascarpone-stabilized whipped cream stays fluffy longer than whipped cream alone.
- Toasted pecans and toffee bits provide a delicious crunchy contrast to the soft cake.
- For the best presentation, add a final sprinkle of toffee bits and a drizzle of warm butterscotch sauce just before serving.
Quick Recipe Summary
Toffee Butterscotch Poke Cake is a classic American make-ahead dessert featuring a tender homemade vanilla sheet cake baked in a 9×13-inch pan. After baking, the warm cake is poked with holes and soaked in a rich mixture of butterscotch topping and sweetened condensed milk, creating an incredibly moist texture. Once chilled, it’s finished with a stabilized whipped cream made with mascarpone cheese, then topped with crunchy toffee bits and toasted pecans. This recipe is beginner-friendly, easy to prepare in advance, stores well in the refrigerator, and is an excellent choice for holidays, potlucks, birthdays, and family gatherings.
More Recipes:
- Vanilla Layer Cake with Chocolate Buttercream
- This Butter-Soaked Pound Cake Is Insanely Moist (Bakery Secret Inside!)
- This Viral Pink Strawberry Cake Is So Soft It Melts (Easy Cheesecake Frosting)
- This Viral Strawberry Crunch Cake Is Dangerously Addictive (Easy Poke Cake!)
- Sweet Potato Pound Cake with Pecan Glaze
This Toffee Butterscotch Poke Cake combines a soft homemade vanilla cake with a rich butterscotch soak, fluffy whipped topping, and a crunchy toffee-pecan finish. The recipe is straightforward enough for beginner bakers while offering the flavor and presentation expected from a special-occasion dessert.
Preparing it a day in advance allows the filling to fully absorb into the cake, resulting in a moist, flavorful dessert that slices cleanly and travels well. Whether you’re serving it at a holiday gathering, a family dinner, or a potluck, it’s a dependable recipe that balances sweetness, texture, and ease of preparation.