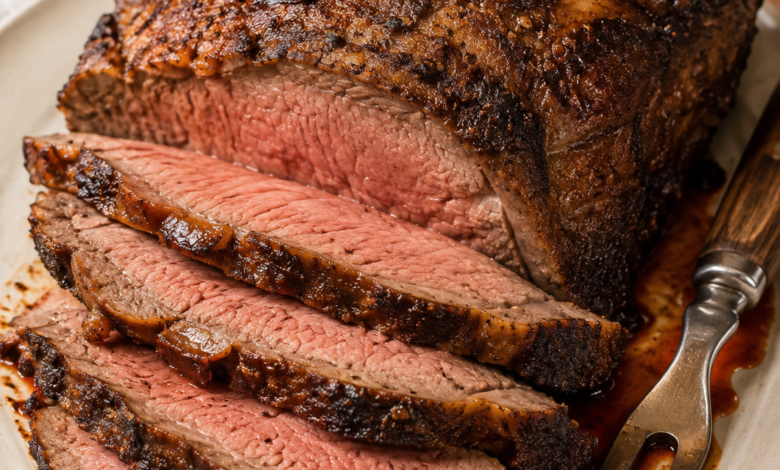
Top Sirloin Roast Recipe with a Deep Seasoned Crust
Quick Answer: This top sirloin roast recipe starts with a well-dried, seasoned beef roast that is seared for deep browning, coated with a savory pepper-and-garlic seasoning paste, then oven-roasted at 325°F. A thermometer, a proper resting period, and slicing against the grain help produce tender slices with a browned crust, rosy center, and simple pan juices.
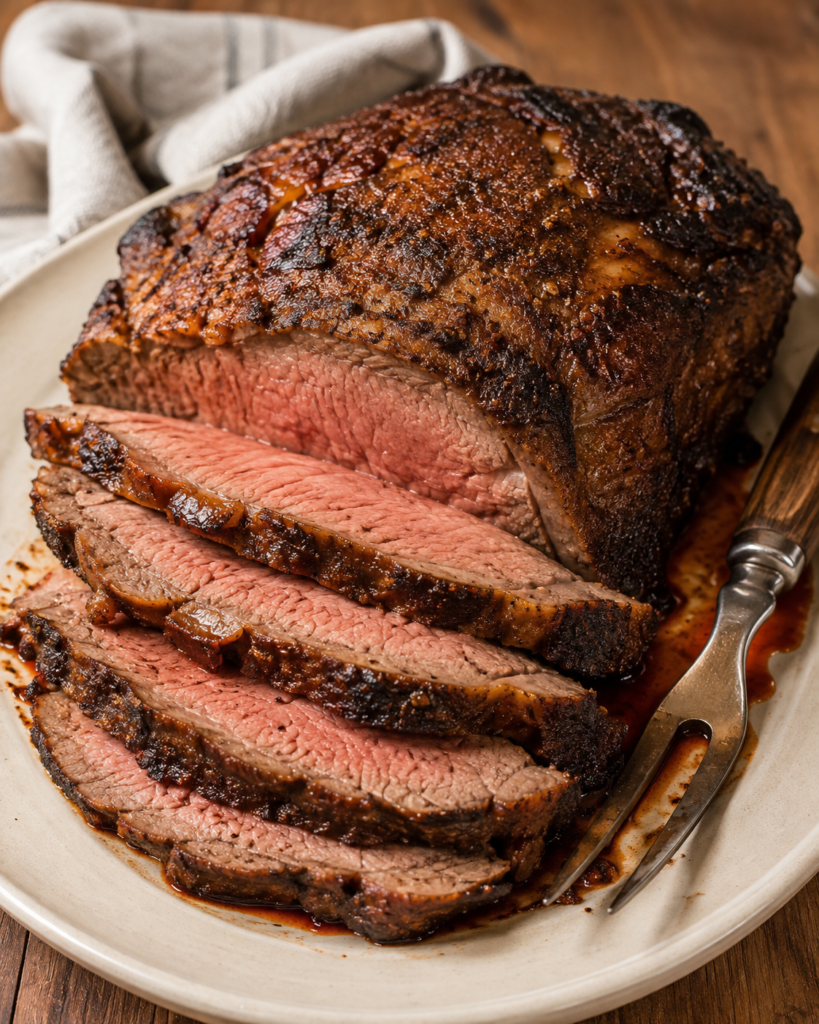
A top sirloin roast is a practical choice when you want the carved-roast experience without turning dinner into an overly complicated project. This version builds flavor in stages: salt seasons the beef, a hot skillet creates the first layer of browning, and the seasoned exterior develops into a dark mahogany crust in the oven.
Inside, the goal is tender beef with visible grain and plenty of moisture rather than a dry, uniformly brown roast. Resting before carving matters just as much as roasting, and thick slices show off the contrast between the seasoned exterior and juicy center.
It works especially well for a Sunday dinner, family gathering, or any meal where you want a substantial centerpiece with familiar sides. If you enjoy slower, fork-tender beef dinners too, Tender Chuck Roast Recipe is a useful related recipe to explore.
Why This Top Sirloin Roast Works
Several small choices make this method more dependable.
Drying the surface encourages browning. Moisture on the outside of beef has to evaporate before the meat can brown effectively. Patting the roast dry—and seasoning it uncovered in the refrigerator when time allows—creates a drier exterior that develops a stronger crust.
The beef is seared before the spice mixture goes on. Garlic powder, paprika, mustard, and other seasonings can scorch in a very hot skillet. Browning the beef first lets you use enough heat for a good sear without burning the seasoning.
A moderate oven temperature gives you control. Roasting at 325°F lets the exterior continue to brown while the center cooks more gradually.
A thermometer matters more than the clock. Two roasts of the same weight can cook differently because of thickness, starting temperature, and oven variation. Time gives you a planning range; internal temperature tells you when the beef is actually ready.
Resting protects the juices. Letting the roast sit before carving gives the meat time to settle and makes it easier to cut clean, substantial slices.
Slicing against the grain improves tenderness. Cutting across the visible muscle fibers shortens them, making each bite easier to chew.
Recipe Card
Recipe: Deeply Seasoned Top Sirloin Roast with Pan Juices
Prep Time: 20 minutes
Cook Time: 1 hour 20 minutes to 1 hour 40 minutes
Rest Time: 20 minutes
Total Time: About 2 hours 20 minutes
Servings: 8
Course: Main Course / Dinner
Cuisine: American
Difficulty: Intermediate
Estimated Calories: About 410 per serving
Ingredients
For the Roast
- 1 boneless top sirloin roast, 3½–4 pounds
- 2½ teaspoons kosher salt
- 2 tablespoons neutral high-heat oil, such as avocado or canola oil
- 1 tablespoon Dijon mustard
- 2 teaspoons Worcestershire sauce
- 2 teaspoons coarsely ground black pepper
- 1½ teaspoons garlic powder
- 1 teaspoon onion powder
- 1 teaspoon smoked paprika
- ¾ teaspoon dried thyme
For the Pan Juices
- ½ cup low-sodium beef broth
- 1 teaspoon Worcestershire sauce
- 1 tablespoon unsalted butter
Ingredient Notes
Top sirloin roast: Choose a compact roast with reasonably even thickness. An extremely tapered piece may cook unevenly, leaving the narrow end more done than the center.
Kosher salt: Salting several hours ahead is useful because the roast can sit uncovered in the refrigerator while its exterior dries.
Coarse black pepper: The larger pepper particles contribute visible seasoning and a more substantial crust.
Dijon mustard: Only a tablespoon is needed. It helps the dry seasonings cling without turning the exterior into a heavy glaze.
Low-sodium beef broth: Using low-sodium broth gives you more control because the browned pan drippings and Worcestershire sauce already contribute saltiness.
Equipment
- Paper towels
- Small mixing bowl
- 12-inch cast-iron or other oven-safe heavy skillet
- Tongs
- Instant-read or probe meat thermometer
- Cutting board
- Sharp carving knife
- Aluminum foil
Instructions
- Dry and shape the roast. Pat every surface of the beef thoroughly dry with paper towels. Trim only unusually thick exterior fat, leaving roughly ¼ inch where appropriate. If the roast is uneven, tie it at 1½- to 2-inch intervals with kitchen twine. A fairly uniform shape helps the center cook more evenly.
- Season with salt. Sprinkle the kosher salt over the entire roast. For the strongest crust, refrigerate it uncovered for 4–24 hours. If you’re cooking the same day, you can continue immediately, but make sure the surface is still dry before searing.
- Preheat the oven. Set the oven to 325°F. If the beef has been refrigerated overnight, take it out while the oven heats.
- Mix the seasoning paste. Combine Dijon mustard, Worcestershire sauce, coarse black pepper, garlic powder, onion powder, smoked paprika, and thyme. It should look like a thin seasoning paste rather than a thick sauce.
- Sear the beef. Heat the oil in a heavy oven-safe skillet over medium-high heat. Add the roast and brown each large side for about 2–3 minutes, then briefly sear the narrower edges. Look for deep brown color. If the pan begins smoking aggressively or the beef turns black, reduce the heat.
- Coat the roast. Take the skillet off the heat and spread the seasoning mixture over the top and sides. Keep the coating relatively thin. The goal is a seasoned crust that roasts onto the beef, not a wet layer of mustard.
- Roast. Transfer the skillet to the 325°F oven, positioning the fattier side of the roast upward when possible. Roast until the thickest center reaches 145°F. For a 3½- to 4-pound roast, begin checking well before the end of the expected cooking window rather than relying entirely on elapsed time.
- Rest before carving. Move the roast to a cutting board and loosely tent it with foil for 20 minutes. Avoid wrapping it tightly; trapped steam can soften the crust you’ve worked to develop.
- Prepare the pan juices. Carefully remove excess fat from the skillet, leaving roughly 1 tablespoon along with the browned bits. Add beef broth and Worcestershire sauce over medium heat. Scrape the skillet and simmer for 3–5 minutes. Remove it from the heat and swirl in the butter. The finished juices should remain light and pourable rather than becoming a thick gravy.
- Slice against the grain. Look closely at the direction of the muscle fibers, then cut across them into ⅓- to ½-inch slices. Arrange the slices around the remaining roast and spoon a restrained amount of pan juices underneath or around them so the crust stays visible.
Chef Tips
- Give the roast enough surface area in the skillet. A heavy pan that comfortably holds the beef will brown more effectively than a cramped pan.
- Use the thermometer in the thickest section. Avoid pushing the probe into a large pocket of fat or too close to the exterior.
- Check earlier than you think you need to. You can always continue roasting, but you can’t undo an overcooked roast.
- Keep the seasoning paste thin. Too much moisture on the exterior works against the crust you’re trying to build.
- Don’t drown the sliced beef in pan juices. Spoon them around the meat instead. The contrasting dry-looking crust and juicy cut surfaces are part of what makes roast beef appealing.
- Use a long, sharp carving knife. Smooth strokes produce cleaner slices than sawing repeatedly with a short dull knife.
- Look at the grain before you start slicing. It is easier to identify the fiber direction while the roast is still whole.
- Cut substantial slices for a Sunday-roast presentation. Thin slices work for sandwiches, but approximately ⅓ to ½ inch better matches this dinner-style roast.
- Save the resting juices. If liquid collects on the cutting board, stir it into the pan juices rather than discarding it.
- Seasoning ahead is worth the time when possible. The uncovered refrigerator rest is an easy way to improve surface dryness without adding another cooking technique.
Common Mistakes to Avoid
1. Putting wet beef into the skillet.
A damp surface slows browning and encourages steaming. Pat the roast dry before it reaches the pan. If moisture appears after refrigeration, blot it again.
2. Applying the spice paste before a very hot sear.
Mustard, paprika, and powdered seasonings can darken too quickly. Sear the plain salted beef first, then add the seasoning mixture.
3. Treating cooking time as an exact rule.
Roast dimensions and ovens vary. Use the stated time as a planning guide and the thermometer as the deciding tool.
4. Using extremely high heat throughout cooking.
Aggressive heat can darken the exterior before the center is ready. The initial sear builds browning; the 325°F oven finishes the roast more steadily.
5. Skipping the resting period.
Carving immediately makes the roast harder to slice neatly and releases more liquid onto the cutting board. Give it the full 20 minutes.
6. Cutting in the same direction as the grain.
Long muscle fibers can make otherwise properly cooked beef seem tougher. Rotate the roast if necessary and slice across the fibers.
7. Turning the pan juices into heavy gravy by accident.
This recipe is designed for a small amount of concentrated, pourable beef juices. Reduce only slightly and finish with butter rather than flour.
Variations
Black Pepper Crust
Increase the coarse black pepper to 1 tablespoon and reduce the smoked paprika to ½ teaspoon. The method remains the same, but the roast develops a more assertive pepper-forward flavor.
Garlic-Herb Roast
Add 1 teaspoon finely crushed dried rosemary to the seasoning mixture. This gives the beef a more aromatic herb profile while keeping the same roasting method and texture.
Smoky Seasoned Roast
Increase the smoked paprika to 1½ teaspoons. Keep the remaining seasoning unchanged so the smoke remains a background flavor rather than making the roast taste like barbecue.
Storage Instructions
Room Temperature: Don’t leave cooked roast beef sitting out for extended periods. Refrigerate leftovers promptly after the meal.
Refrigerator: Store the roast, whole or sliced, in a shallow airtight container for up to 3–4 days. Keep the pan juices in a separate container when practical.
Freezer: Divide the beef into useful portions, wrap well, and freeze. For best eating quality, use it within about 3 months.
Best Storage Container: An airtight glass or food-storage container works well. Removing excess air helps protect the exposed cut surfaces.
Food Quality Note: Keeping the roast in a larger piece generally protects it from drying more effectively than slicing every leftover portion immediately.
How to Reheat
The biggest challenge with reheated roast beef is preserving moisture.
For sliced beef, place only the amount you need in a covered skillet with a spoonful of reserved pan juices or beef broth. Warm gently, turning once. The small amount of added liquid and covered pan help prevent the exposed slices from drying as quickly.
Avoid repeatedly reheating the entire roast. Cut off what you need and leave the remainder refrigerated.
For leftover food safety, use the reheating temperature guidance specified in the validated recipe and follow current USDA recommendations when serving stored leftovers.
Make-Ahead Instructions
The easiest part to prepare ahead is the seasoning stage.
Salt the roast and refrigerate it uncovered for 4–24 hours before cooking. This both reduces work on serving day and helps dry the surface for better browning.
You can also mix the dry seasonings ahead and keep them covered at room temperature. Combine them with the Dijon mustard and Worcestershire sauce shortly before the roast is seared.
For the best crust and freshly carved texture, roast the beef on the day you plan to serve it rather than fully cooking and reheating the entire roast.
Serving Suggestions
This seasoned top sirloin roast fits naturally with familiar Sunday-dinner sides.
For something creamy, serve it with mashed potatoes so they can catch a little of the pan juices. Roasted potatoes are a good alternative when you want more browned texture on the plate.
Green beans, roasted carrots, asparagus, or a simple mixed-green salad provide a lighter contrast to the beef. Soft dinner rolls also work well for soaking up the juices.
Horseradish cream can be served separately for guests who enjoy a sharper sauce, but the roast doesn’t require an additional topping.
For drinks, consider unsweetened iced tea, sparkling water with lemon, or a dry red wine. A simple fruit dessert or lightly sweet baked dessert makes a comfortable finish to the meal.
Frequently Asked Questions
Is top sirloin good for roast beef?
Yes. A boneless top sirloin roast can be roasted whole and carved into substantial slices. Because it isn’t a braising cut, temperature control, resting, and slicing against the grain are particularly important.
Should I sear a top sirloin roast before putting it in the oven?
For this recipe, yes. Searing develops the deep exterior browning first. The mustard-and-spice mixture is added afterward so the powdered seasonings are less likely to burn in the hot skillet.
How do I keep top sirloin roast tender?
Don’t cook solely by time. Monitor the center with a thermometer, allow the finished roast to rest, and carve across the visible muscle grain. Those three steps have a major effect on the finished eating texture.
Can I season the roast the night before?
Yes. Salt it and refrigerate it uncovered for up to 24 hours. The advance seasoning also helps dry the exterior, which supports stronger browning when the beef is seared.
How do I know when the roast is done?
Insert an instant-read or probe thermometer into the thickest part of the roast without placing it in a large fat pocket. This recipe uses 145°F as its minimum finished internal temperature rather than judging doneness only from color.
Why does roast beef need to rest before slicing?
Resting gives the beef time to settle after cooking and helps you carve cleaner, juicier-looking slices. This recipe calls for a 20-minute rest, considerably longer than the minimum food-safety resting period.
How do I know which direction is against the grain?
Look for the parallel lines formed by the muscle fibers. Position your knife so each cut crosses those lines rather than following them. The fibers should look shorter on the cut surface after slicing.
Can I freeze leftover top sirloin roast?
Yes. Portion it, wrap it tightly, and freeze it in an airtight container. Keeping some pieces larger rather than slicing everything very thin can help protect the beef’s texture.
What’s the best way to reheat roast beef without drying it out?
Warm slices gently in a covered skillet with a small amount of beef broth or reserved pan juices. Reheat only the amount you’re serving instead of repeatedly heating and cooling the entire roast.
Key Takeaways
- Drying and searing the beef creates the foundation for the deep mahogany crust.
- Add the mustard-and-spice coating after searing to reduce the chance of scorched seasonings.
- Use a thermometer rather than relying entirely on cooking time.
- Rest the roast for 20 minutes and slice it against the grain for better carving and tenderness.
- Store leftovers airtight and reheat individual portions gently with a little added moisture.
Quick Recipe Summary
This top sirloin roast recipe uses a 3½- to 4-pound boneless roast seasoned with salt, black pepper, garlic, onion, thyme, Dijon mustard, Worcestershire sauce, and smoked paprika. The beef is seared first, coated with the seasoning mixture, then roasted at 325°F until the center reaches the recipe’s target temperature. After a 20-minute rest, it is carved against the grain into thick slices. Beef broth, skillet drippings, Worcestershire sauce, and butter create a simple pan juice for serving. The result is a substantial roast with a dark seasoned exterior and tender sliced center.
More Recipes
- Tender Chuck Roast Recipe
- Oven Prime Rib Recipe
- Pot Roast Dinner Recipe
- Slow Cooker Pot Roast
- Roast Beef Sandwich
Useful Links
- USDA Safe Minimum Internal Temperatures
- USDA Leftovers and Food Storage
- FDA Food Safety During Preparation
- Cooperative Extension Guide to Baking Potatoes
- MyPlate Vegetable Serving Guidance