

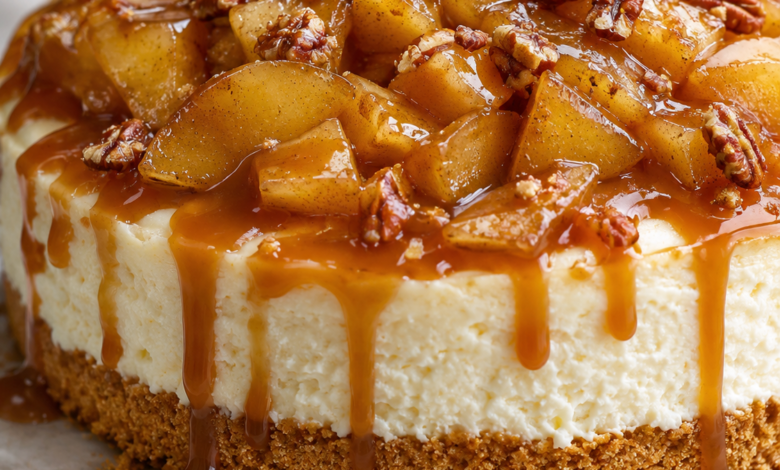
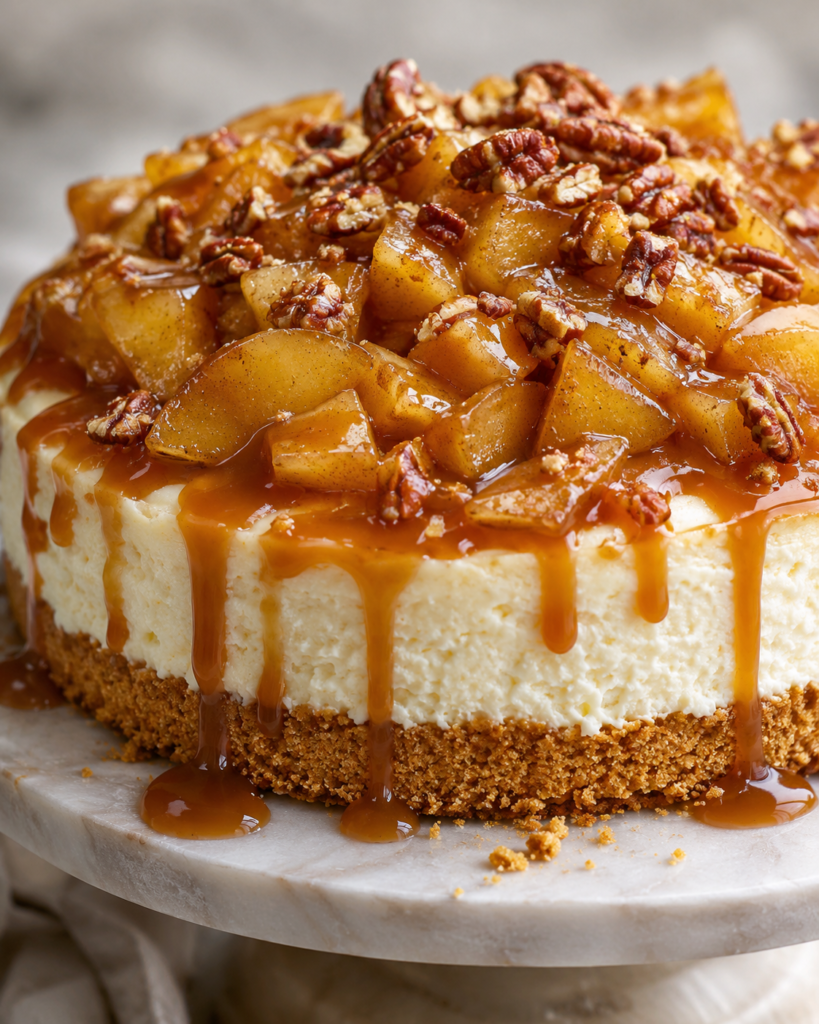
This No-Bake Caramel Apple Cheesecake combines a buttery graham cracker crust, smooth vanilla cheesecake filling, tender cinnamon-cooked apples, and rich salted caramel. Finished with toasted pecans, it’s a beautiful fall dessert that doesn’t require baking the cheesecake. Make it ahead, refrigerate overnight, and serve it at Thanksgiving, Christmas, or your next family gathering.
Quick Answer
No-Bake Caramel Apple Cheesecake is a chilled dessert made with a graham cracker crust, creamy cream cheese filling, cinnamon caramel apples, and salted caramel sauce. It takes about 30 minutes of preparation, 12 minutes to cook the apple topping, and at least 8 hours to chill. Fresh apples give it a sweet-tart flavor that balances the rich cheesecake filling.
Why You’ll Love This No-Bake Caramel Apple Cheesecake
There are several reasons this cheesecake deserves a place on your fall dessert table.
- No oven required for the cheesecake: The crust and filling are assembled and chilled rather than baked.
- Fresh cinnamon apples: Cooking fresh apples with brown sugar, butter, and cinnamon creates a tender topping with plenty of autumn flavor.
- Creamy cheesecake filling: Whipped heavy cream gives the cream cheese mixture a lighter texture.
- Buttery graham cracker crust: The crumb base adds a slightly crunchy contrast to the smooth filling.
- Perfect for making ahead: The cheesecake needs several hours to chill, so you can prepare the base the day before serving.
- Beautiful presentation: Caramel dripping down the sides, golden apples, and toasted pecans make this dessert look special without complicated decorating.
If you enjoy homemade fruit desserts, try our Easy Apple Dapple Cake, another delicious way to use fresh apples.
Recipe Summary
| Detail | Information |
|---|---|
| Prep Time | 30 minutes |
| Cook Time | 12 minutes |
| Chill Time | 8 hours |
| Total Time | 8 hours 42 minutes |
| Servings | 12 |
| Cuisine | American |
| Course | Dessert |
| Difficulty | Intermediate |
| Calories | Approximately 590 per serving |
Ingredients You’ll Need
This cheesecake has four main components: a graham cracker crust, creamy cheesecake filling, cinnamon apple topping, and salted caramel finish.


For the Graham Cracker Crust
- 2 cups graham cracker crumbs
- 6 tablespoons unsalted butter, melted
- 2 tablespoons light brown sugar
- 1 pinch salt
The melted butter binds the crumbs together, while brown sugar adds a subtle caramel flavor.
For the Cheesecake Filling
- 24 ounces full-fat cream cheese, softened
- 1 cup heavy whipping cream, cold
- ¾ cup powdered sugar
- 2 teaspoons pure vanilla extract
- 1 tablespoon fresh lemon juice
Use full-fat cream cheese for a richer filling. Let it soften before mixing so it blends smoothly without lumps.
Keep the heavy cream cold until you’re ready to whip it. Cold cream is easier to whip into stiff peaks.
For the Cinnamon Caramel Apple Topping
- 3 medium Granny Smith apples, peeled, cored, and diced
- 2 tablespoons unsalted butter
- ¼ cup light brown sugar
- 1 teaspoon ground cinnamon
- 1 tablespoon fresh lemon juice
- 1 tablespoon cornstarch
- 2 tablespoons water
- 1 pinch salt
Granny Smith apples are a good choice because their tart flavor balances the sweetness of the caramel and cheesecake.
For the Salted Caramel and Pecan Topping
- ½ cup thick caramel sauce
- ¼ cup chopped toasted pecans
- ¼ teaspoon flaky sea salt
Choose a thick caramel sauce that will drizzle over the cheesecake without immediately running off. The toasted pecans add a pleasant crunch.
Equipment
You’ll need:
- 9-inch springform pan
- Parchment paper
- Electric hand mixer or stand mixer
- Large mixing bowl
- Medium saucepan
- Small mixing bowl
- Whisk
- Rubber spatula
- Measuring cups and spoons
- Sharp knife
How to Make No-Bake Caramel Apple Cheesecake
Step 1: Prepare the Graham Cracker Crust
Line the bottom of a 9-inch springform pan with parchment paper.
In a mixing bowl, combine the graham cracker crumbs, melted butter, brown sugar, and salt. Stir until the mixture resembles wet sand and holds together when pressed between your fingers.
Transfer the crumbs to the prepared pan. Press firmly across the bottom to create an even crust.
Refrigerate for at least 30 minutes while preparing the cheesecake filling.
Helpful tip: Use the flat bottom of a measuring cup to press the crumbs evenly. A firmly packed crust will hold together better when you slice the cheesecake.
Step 2: Make the Cheesecake Filling
Place the softened cream cheese in a large mixing bowl. Beat on medium speed until completely smooth and creamy.
Add the powdered sugar and vanilla extract. Continue beating until everything is combined, scraping down the sides of the bowl as needed.
Mix in the fresh lemon juice.
In a separate chilled bowl, whip the cold heavy cream until stiff peaks form. The cream should hold its shape when you lift the beaters.
Gently fold the whipped cream into the cream cheese mixture in two additions.
What to look for: The finished filling should be thick, smooth, and airy, without visible streaks of whipped cream.
Step 3: Assemble and Chill the Cheesecake
Remove the chilled crust from the refrigerator.
Spoon the cheesecake filling over the crust and spread it evenly with a rubber spatula. Smooth the surface and gently tap the pan against the counter to release large air pockets.
Cover loosely and refrigerate for at least 8 hours. Overnight chilling is even better for a firmer texture.
Avoid rushing this step. The filling needs sufficient time in the refrigerator to become firm enough for clean slices.
Step 4: Prepare the Cinnamon Caramel Apples
Peel, core, and dice the apples into small, evenly sized pieces.
Melt the butter in a medium saucepan over medium heat. Add the diced apples and cook for approximately 4 minutes, stirring occasionally.
Add the brown sugar, cinnamon, lemon juice, and salt. Continue cooking for another 4–5 minutes, until the apples are tender but still hold their shape.
In a small bowl, whisk the cornstarch and water until smooth.
Pour the mixture into the saucepan while stirring. Cook for another 1–2 minutes, until the apple juices thicken into a glossy coating.
Remove from the heat and let the topping cool completely.
What to look for: The apples should be soft enough to bite through but not mushy. The sauce should lightly coat the pieces instead of pooling like thin juice.
Step 5: Prepare the Caramel and Pecans
If using homemade caramel sauce, prepare it in advance and allow it to cool until thick but pourable.
Place the chopped pecans in a dry skillet over medium-low heat. Toast for approximately 3–4 minutes, stirring frequently.
Once fragrant, transfer them to a plate to cool.
Keep the pecans separate until you’re ready to decorate the cheesecake.
Step 6: Decorate the Cheesecake
Carefully remove the springform ring from the chilled cheesecake.
Transfer the cheesecake to a serving plate or cake stand.
Spoon the cooled cinnamon caramel apples generously over the surface, spreading them evenly while allowing some of the topping to approach the edges.
Drizzle the caramel sauce over the apples and down the sides of the cheesecake.
Finish with the toasted pecans and a small pinch of flaky sea salt.
Refrigerate until ready to serve.
Chef Tips
- Use full-fat cream cheese. It provides a richer flavor and a better consistency for a chilled cheesecake.
- Soften the cream cheese properly. Room-temperature cream cheese blends more easily and helps prevent lumps.
- Keep the heavy cream cold. Cold cream whips more efficiently and produces a better structure.
- Don’t skip the lemon juice. Its slight acidity balances the sweetness of the filling and caramel apples.
- Choose firm apples. Granny Smith apples are especially suitable because they retain their shape during cooking.
- Cut the apples evenly. Similar-sized pieces cook at approximately the same rate, making the topping more consistent.
- Cool the apple topping completely. Warm apples can soften the cheesecake filling and affect its texture.
- Don’t make the caramel too thin. Thick caramel creates a more attractive drizzle and stays on the cheesecake longer.
- Toast the pecans gently. Keep the heat moderate and stir frequently to prevent burning.
- Use a warm, dry knife for slicing. Dip a sharp knife in warm water, wipe it dry, and clean it between cuts.
Common Mistakes to Avoid
1. Using Cold Cream Cheese
Cold cream cheese can leave small lumps in the filling.
How to avoid it: Let the cream cheese soften at room temperature before mixing.
2. Not Whipping the Cream Enough
Under-whipped cream may not provide enough structure for the cheesecake filling.
How to avoid it: Continue whipping until stiff peaks form. The cream should hold its shape rather than fall immediately from the beaters.
3. Overcooking the Apples
Apples that cook for too long can become mushy and lose their texture.
How to avoid it: Cook until tender but still slightly firm.
4. Adding Warm Apple Topping
Warm topping can soften the cheesecake and affect its appearance.
How to avoid it: Allow the apples to cool completely before assembling.
5. Making the Apple Sauce Too Thin
Apples release moisture during cooking. Without enough thickening, the topping may become watery.
How to avoid it: Prepare the cornstarch slurry and cook until the sauce becomes glossy and thick.
6. Using Runny Caramel
Thin caramel can flow off the cheesecake and collect around the base.
How to avoid it: Use a thick caramel sauce and let it cool slightly before decorating.
7. Slicing Before the Cheesecake Sets
The filling may collapse or smear if it hasn’t chilled long enough.
How to avoid it: Refrigerate for at least 8 hours, preferably overnight.
Variations
Caramel Apple Cheesecake with Gingersnap Crust
Replace the graham cracker crumbs with finely crushed gingersnap cookies. This gives the crust a stronger ginger and spice flavor that works particularly well with cinnamon apples.
Caramel Apple Pecan Cheesecake
Increase the toasted pecans to ½ cup. Mix some into the apple topping and reserve the rest for decorating.
Mini Caramel Apple Cheesecakes
Divide the crust and filling among individual muffin liners. Refrigerate until firm, then add smaller portions of cinnamon apples and caramel.
This version is convenient for parties because each guest gets an individual dessert.
Extra Cinnamon Version
Add another ¼ teaspoon of ground cinnamon to the apple topping for a warmer, more pronounced spice flavor.
Storage Instructions
Room Temperature
This cheesecake contains cream cheese and heavy cream, so it should not be left unrefrigerated for extended periods.
Keep it out for no more than 2 hours during serving, or 1 hour when the surrounding temperature is above 90°F.
For more information, see the USDA food safety guidance for perishable foods.
Refrigerator
Store leftover cheesecake in an airtight cake container or tightly covered food container.
Keep refrigerated at 40°F or below and use within 3–4 days.
For the best texture, store the apple topping separately when possible and add it shortly before serving.
Freezer
For better results, freeze the cheesecake without the apple topping and caramel.
Wrap it tightly and place it in a freezer-safe container. Freeze for up to 1 month for best quality.
Thaw overnight in the refrigerator before decorating.
For additional guidance, consult the FDA’s food storage recommendations.
How to Reheat
Reheating is not recommended for this dessert.
No-bake caramel apple cheesecake is intended to be served chilled. Heating it can soften the cream cheese filling and make the caramel topping runny.
If the caramel becomes too thick after refrigeration, warm a small amount separately in short microwave intervals and drizzle it over the chilled cheesecake.
Make-Ahead Instructions
This cheesecake is a convenient dessert for holiday gatherings because most of the preparation can be completed the day before.
One day before serving:
- Prepare and chill the graham cracker crust.
- Make the cheesecake filling.
- Assemble the cheesecake and refrigerate overnight.
- Prepare the cinnamon apple topping and refrigerate it separately once completely cooled.
On serving day:
- Remove the cheesecake from the springform pan.
- Prepare or gently loosen the caramel sauce if needed.
- Spoon the chilled apple topping over the cheesecake.
- Add caramel, toasted pecans, and flaky sea salt.
- Keep refrigerated until serving.
Adding the topping closer to serving time helps preserve the cheesecake’s appearance and keeps the crust from absorbing unnecessary moisture.
Serving Suggestions
This cheesecake is rich and creamy, so it pairs nicely with drinks that aren’t overly sweet.
Try serving it with:
- Freshly brewed coffee.
- Espresso.
- Hot apple cider.
- Cinnamon tea.
- Unsweetened black tea.
- Cold milk.
For a holiday dessert table, serve it alongside other homemade treats such as our Strawberry Cheesecake Crumble Bars with Vanilla Glaze.
The contrast between the strawberry topping and cinnamon apples makes a colorful dessert spread.
Frequently Asked Questions
Can I make no-bake caramel apple cheesecake without an oven?
Yes. The cheesecake itself is assembled without baking. The crust is made from graham cracker crumbs and melted butter, while the apple topping is cooked briefly on the stovetop.
How long does no-bake caramel apple cheesecake need to chill?
Allow at least 8 hours in the refrigerator. Overnight chilling is recommended because it gives the filling more time to firm up.
Can I use apple pie filling instead of fresh apples?
You can use apple pie filling as a shortcut, but it will change the recipe’s texture and sweetness. This version uses fresh apples cooked with butter, brown sugar, cinnamon, and lemon juice.
Which apples are best for caramel apple cheesecake?
Granny Smith apples are an excellent choice because they have a tart flavor and firm texture. Honeycrisp apples are another option if you prefer a slightly sweeter topping.
Why is my no-bake cheesecake too soft?
The filling may be too soft because the heavy cream was under-whipped, the cream cheese mixture was too warm, or the cheesecake did not chill long enough. Make sure the cream reaches stiff peaks and allow the full chilling time.
Can I make this cheesecake the day before?
Yes. Prepare the crust and filling the day before and refrigerate overnight. You can also prepare the apple topping separately and add it shortly before serving.
Can I freeze caramel apple cheesecake?
Yes. For better results, freeze the plain cheesecake without its apple topping and caramel. Wrap it tightly and freeze for up to one month for best quality.
How do I prevent the apple topping from becoming watery?
Cook the apples until tender, then add the cornstarch slurry. Continue cooking until the released juices become thick and glossy. Allow the topping to cool completely before using it.
How do I cut clean slices?
Make sure the cheesecake is fully chilled. Use a sharp knife warmed under hot water and wiped dry. Clean the blade between slices to keep the layers neat.
Key Takeaways
- Use full-fat cream cheese and cold heavy cream for a creamy filling.
- Granny Smith apples provide a pleasant tart contrast to the sweet caramel.
- Cook the apple topping until tender but not mushy.
- Refrigerate the cheesecake for at least 8 hours before serving.
- Add the cooled apple topping, caramel, and toasted pecans shortly before serving for the best presentation.
Quick Recipe Summary
No-Bake Caramel Apple Cheesecake is a chilled American dessert featuring a buttery graham cracker crust, creamy vanilla cream cheese filling, fresh cinnamon-cooked apples, salted caramel, and toasted pecans. Prepare the crust and filling, then refrigerate for at least 8 hours until firm. Cook the apples with butter, brown sugar, cinnamon, and lemon juice, thickening the juices with cornstarch. Once the cheesecake is chilled and the apples are completely cool, assemble the topping and finish with caramel and pecans. The recipe makes 12 servings and is especially suitable for fall gatherings, Thanksgiving, and Christmas.
More Recipes from BotaInfo
- Easy Apple Dapple Cake
- Strawberry Cheesecake Crumble Bars with Vanilla Glaze
- Cranberry Jalapeño Cream Cheese Dip
Food Safety Resources
- USDA: The 2-Hour Rule for Leaving Food Out
- USDA: How to Handle Leftovers Safely
- FDA: Are You Storing Food Safely?
Recipe development note: This recipe was developed from a visual food concept and a proposed home-kitchen formulation. It has not yet been physically kitchen-tested. Preparation times, texture, final yield, and nutritional estimates should be verified through actual testing before publication.


