

Quick Answer
These fluffy buttermilk pancakes are light, tender, and beautifully golden with crisp edges and a soft, airy center. Made with simple pantry ingredients and a few easy techniques, they’re perfect for weekend breakfasts, holiday brunches, or anytime you’re craving homemade pancakes that stack tall and soak up warm maple syrup beautifully.
Homemade Fluffy Buttermilk Pancakes You’ll Want to Make Again and Again
There’s something timeless about a warm stack of homemade buttermilk pancakes. Crisp around the edges, soft in the center, and finished with melting butter and real maple syrup, they’re the kind of breakfast that feels comforting without requiring complicated ingredients or advanced cooking skills.
This recipe focuses on consistency as much as flavor. A few small techniques—like resting the batter and cooking over moderate heat—make a noticeable difference, helping every batch cook evenly while developing the light, fluffy texture most home cooks are looking for.
Whether you’re preparing a relaxed Sunday breakfast, feeding a hungry family, or planning a special brunch, these pancakes are easy to make with ingredients you probably already have in your kitchen. They also freeze well, making them a practical choice for busy mornings later in the week.
If you enjoy homemade breakfast favorites, you’ll also love Homemade Belgian Waffles, another classic recipe that’s perfect for weekends and special occasions.
Why This Recipe Works
Many pancake recipes promise fluffy results, but small details often determine whether your pancakes rise beautifully or turn out flat and dense. This recipe combines simple ingredients with dependable techniques to produce consistently soft, tall pancakes every time.
Buttermilk Creates a Tender Crumb
Buttermilk adds a gentle tang while reacting with baking soda to create extra lift. The result is a lighter texture and a softer interior than pancakes made with regular milk alone.
The Batter Is Mixed Gently
Overmixing develops gluten, which can make pancakes chewy instead of fluffy. Folding the ingredients together just until the flour disappears leaves a few small lumps in the batter—and that’s exactly what you want.
Resting the Batter Makes a Difference
Giving the batter about 10 minutes to rest allows the flour to fully hydrate while the leavening begins working. This simple step helps create thicker pancakes with a more even rise.
Moderate Heat Builds Better Color
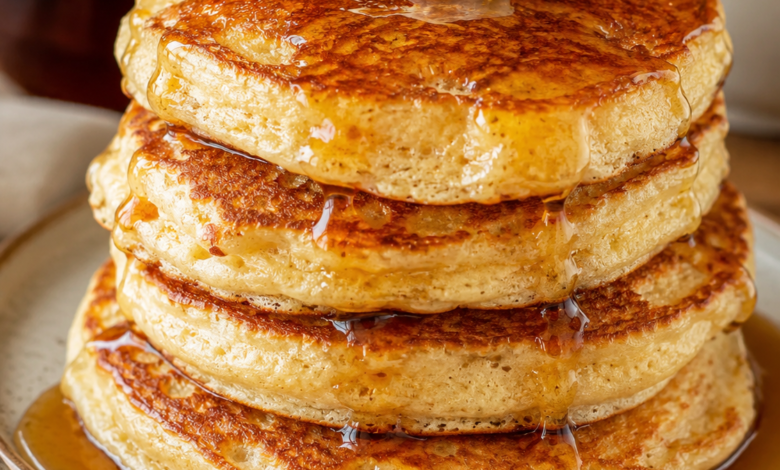
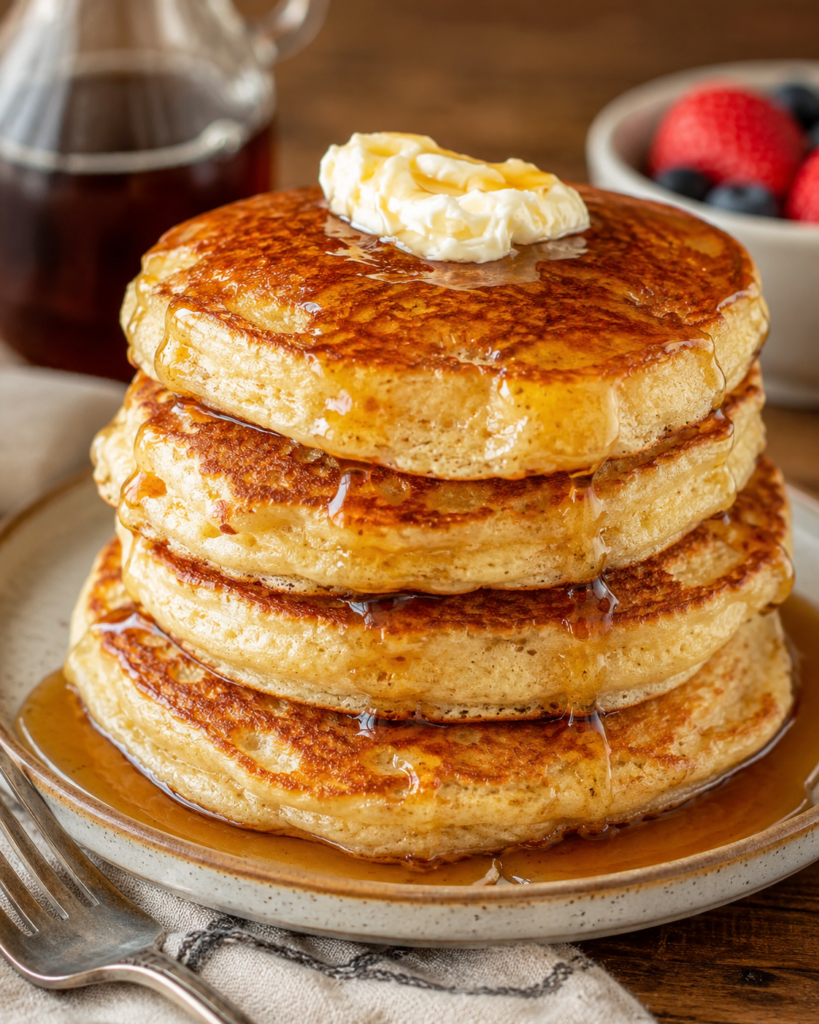
Cooking over medium heat gives the pancakes enough time to cook through before the outside becomes too dark. The result is the rich golden-brown surface and soft interior shown in the finished recipe.
One Flip Is All You Need
Waiting until bubbles cover the surface and the edges begin to dry before flipping helps each pancake keep its height. Flipping only once also preserves the airy structure inside.
Recipe Summary
| Prep Time | 15 minutes |
| Batter Rest | 10 minutes |
| Cook Time | 15 minutes |
| Total Time | 40 minutes |
| Servings | 4 (about 12 pancakes) |
| Course | Breakfast |
| Cuisine | American |
| Difficulty | Easy |
| Estimated Calories | Approximately 430 per serving |
| Best For | Weekend breakfasts, brunch, family breakfasts, meal prep |
| Primary Keyword | Fluffy Buttermilk Pancakes |
| Best Tip | Rest the batter for 10 minutes and cook over medium heat for the tallest, fluffiest pancakes. |
Ingredients
Dry Ingredients
- 2½ cups all-purpose flour, spooned and leveled
- 3 tablespoons granulated sugar
- 2 teaspoons baking powder
- ½ teaspoon baking soda
- ¾ teaspoon fine salt
Wet Ingredients
- 2 cups full-fat buttermilk, at room temperature
- 2 large eggs, at room temperature
- ¼ cup unsalted butter, melted and slightly cooled
- 2 teaspoons pure vanilla extract
For Cooking
- 1 tablespoon unsalted butter
- 1 tablespoon neutral oil (such as canola or avocado oil)
Using a small amount of oil with the butter helps prevent the butter from browning too quickly while still adding rich flavor.
For Serving
- Softened butter
- Warm pure maple syrup
Optional toppings:
- Fresh blueberries
- Sliced strawberries
- Banana slices
- Toasted pecans
- Toasted walnuts
- Fresh whipped cream
Ingredient Notes
Buttermilk
Real cultured buttermilk gives these pancakes their signature fluffy texture and subtle tang. Its acidity reacts with the baking soda, helping the batter rise while keeping the crumb tender.
No buttermilk?
Mix:
- 2 cups whole milk
- 2 tablespoons fresh lemon juice or white vinegar
Let the mixture stand for about 10 minutes before using. While it won’t taste exactly the same as cultured buttermilk, it works well in a pinch.
Flour
Regular all-purpose flour provides the best balance of structure and tenderness.
Avoid bread flour, which contains more protein and can make pancakes chewy instead of light.
Baking Powder & Baking Soda
Both leavening agents play different roles.
- Baking powder provides most of the lift.
- Baking soda reacts with the buttermilk to create additional rise and beautiful golden browning.
Check that both are fresh for the fluffiest results.
Eggs
Room-temperature eggs blend more easily into the batter, creating a smoother mixture and more even cooking.
If you forget to take them out early, place the eggs in warm (not hot) water for about 5 minutes.
Butter
Unsalted butter lets you control the seasoning and contributes a rich, homemade flavor.
For an even deeper flavor, you can lightly brown the butter before adding it to the batter, though regular melted butter produces excellent results.
Vanilla Extract
A small amount of pure vanilla rounds out the buttery flavor without making the pancakes taste like dessert.
Maple Syrup
Warm pure maple syrup complements the pancakes far better than serving it straight from the refrigerator.
Heating it gently for 20–30 seconds allows it to pour more evenly and soak into every layer.
Equipment
You’ll only need a few basic kitchen tools:
- Large mixing bowl
- Medium mixing bowl
- Balloon whisk
- Rubber spatula
- Measuring cups
- Measuring spoons
- ½-cup measuring cup or batter scoop
- Large nonstick skillet, cast-iron skillet, or electric griddle
- Wide spatula for flipping
- Small pastry brush or paper towel for greasing the pan
- Wire rack (optional, for keeping pancakes warm without becoming soggy)
- Baking sheet (optional if warming pancakes in the oven)
Before You Start
A few minutes of preparation helps everything come together smoothly.
- Measure all ingredients before mixing.
- Bring the buttermilk and eggs to room temperature.
- Melt the butter and let it cool slightly.
- Preheat the skillet while preparing the batter.
- Warm the maple syrup just before serving.
These small steps make it much easier to produce evenly cooked, tall, fluffy pancakes on the very first batch.
How to Make Fluffy Buttermilk Pancakes
Making great pancakes is mostly about technique rather than complicated ingredients. Mix the batter gently, give it a short rest, and cook over steady medium heat. Those three simple habits will reward you with pancakes that are tall, tender, and evenly golden every time.
Step 1 – Mix the Dry Ingredients
In a large mixing bowl, whisk together:
- 2½ cups all-purpose flour
- 3 tablespoons granulated sugar
- 2 teaspoons baking powder
- ½ teaspoon baking soda
- ¾ teaspoon salt
Whisk for about 30 seconds until everything is evenly combined.
Why this matters
Evenly distributing the baking powder and baking soda helps every pancake rise consistently.
What success looks like
The mixture should be uniform with no visible streaks of baking powder or clumps of flour.
Step 2 – Combine the Wet Ingredients
In a separate bowl, whisk together:
- 2 cups buttermilk
- 2 large eggs
- ¼ cup melted butter
- 2 teaspoons vanilla extract
Whisk only until smooth.
Why this matters
Combining the wet ingredients first helps distribute the butter and eggs evenly throughout the batter.
What success looks like
The mixture should look creamy and fully blended without separated butter.
Step 3 – Make the Batter
Pour the wet ingredients into the bowl of dry ingredients.
Using a rubber spatula, gently fold everything together until no dry flour remains.
Don’t worry if the batter still contains small lumps.
Why this matters
Overmixing develops gluten, which creates tough pancakes instead of fluffy ones.
What success looks like
The batter should be:
- Thick
- Smooth enough to pour
- Slightly lumpy
- Able to slowly fall from the spatula
Avoid this mistake
If the batter becomes completely smooth like cake batter, it has probably been mixed too much.
Step 4 – Rest the Batter
Allow the batter to rest for 10 minutes before cooking.
Resist the urge to stir it again after resting.
Why this matters
Resting allows the flour to hydrate while giving the baking powder and baking soda time to begin producing tiny air bubbles.
Those bubbles create the tall, fluffy pancakes shown in the finished recipe.
What success looks like
The batter will appear slightly thicker and may show small bubbles on the surface.
Step 5 – Heat the Skillet
Place a nonstick skillet, cast-iron skillet, or electric griddle over medium heat.
Lightly grease it with:
- Butter
- A few drops of neutral oil
The oil keeps the butter from browning too quickly.
How to test the heat
Sprinkle a few drops of water onto the surface.
If they gently dance and evaporate within a couple of seconds, the skillet is ready.
If the water disappears instantly or the pan begins smoking, reduce the heat before cooking.
Step 6 – Portion the Batter
Using a ½-cup measuring cup, pour the batter onto the hot skillet.
Leave about 2 inches between pancakes.
Allow the batter to spread naturally.
Do not flatten it with the measuring cup or spatula.
Why this matters
The thick batter is responsible for creating the tall stack seen in the hero image.
Flattening the batter removes that advantage.
Step 7 – Cook the First Side
Cook each pancake for approximately 2½–3½ minutes.
Rather than watching the clock, watch the pancake.
You’re looking for:
- Small bubbles appearing across the surface.
- Edges beginning to dry.
- A rich golden-brown underside.
These visual cues are much more reliable than cooking time alone.
Step 8 – Flip Only Once
Slide a wide spatula completely underneath the pancake and flip it in one smooth motion.
Cook the second side for another 2–3 minutes.
Avoid pressing down with the spatula.
What success looks like
The finished pancake should:
- Feel springy when lightly touched.
- Be evenly golden on both sides.
- Have a thick, fluffy interior.
- Hold its shape without collapsing.
Step 9 – Keep the Pancakes Warm
Transfer cooked pancakes to a wire rack set over a baking sheet.
Place them in a 200°F (95°C) oven while you finish the remaining batter.
Using a wire rack instead of stacking immediately helps prevent trapped steam from softening the outside.
Step 10 – Serve Immediately
Stack four pancakes on a warm plate.
Top with:
- A generous pat of butter
- Warm maple syrup
Let the syrup slowly cascade down the sides just before serving for the classic homemade presentation.
For an extra-special breakfast, garnish with fresh berries or toasted pecans and serve while the pancakes are still warm and fluffy.
Chef Tips
Small techniques can make a noticeable difference when it comes to fluffy homemade pancakes. These tips will help you get consistent, bakery-quality results every time.
1. Measure Flour Correctly
Too much flour is one of the most common reasons pancakes become dense.
Instead of scooping directly from the bag, spoon the flour into your measuring cup and level it with a knife.
2. Don’t Skip the Batter Rest
Even a short 10-minute rest gives the flour time to absorb moisture while the leavening begins working.
This simple step helps produce noticeably thicker, softer pancakes.
3. Keep the Heat Consistent
Medium heat cooks pancakes evenly from the center outward.
If the skillet is too hot, the outside browns before the inside is fully cooked.
4. Flip Only Once
Wait until bubbles cover most of the surface and the edges begin to dry.
Flipping more than once deflates the pancakes and creates a denser texture.
5. Wipe the Pan Between Batches
Butter left in the skillet eventually burns.
Quickly wipe away dark butter with a paper towel before adding fresh butter for the next batch.
You’ll get beautifully golden pancakes every time.
6. Use Fresh Leavening Agents
Baking powder and baking soda lose strength over time.
If yours has been sitting in the pantry for several months, replacing them can dramatically improve the rise.
7. Warm the Maple Syrup
Warm syrup spreads evenly over the pancakes instead of cooling them immediately.
A quick 20–30 seconds in the microwave is all it takes.
8. Keep Pancakes Warm the Right Way
Instead of stacking freshly cooked pancakes, place them on a wire rack in a 200°F oven.
This prevents trapped steam from making the bottoms soggy.
9. Brown Butter for Extra Flavor
For a deeper, nuttier flavor, lightly brown the butter before adding it to the batter.
It’s optional, but it adds a subtle richness that pairs beautifully with maple syrup.
10. Freeze Extras for Busy Mornings
Allow leftover pancakes to cool completely before freezing them with parchment paper between each layer.
They reheat surprisingly well and make quick weekday breakfasts.
Common Mistakes to Avoid
Even simple pancake recipes can go wrong if a few basic techniques are overlooked. Here’s how to avoid the most common problems.
Overmixing the Batter
What Happens
The pancakes become chewy, tough, and flat.
Why It Happens
Too much mixing develops gluten in the flour.
How to Avoid It
Mix only until the dry flour disappears.
A few lumps are completely normal.
Can It Be Fixed?
Unfortunately, once gluten develops, it can’t be reversed. The best solution is to mix more gently next time.
Cooking Over High Heat
What Happens
The outside burns while the center stays undercooked.
Why It Happens
The skillet is too hot.
How to Avoid It
Cook over medium heat and allow the pan to fully preheat before adding batter.
Can It Be Fixed?
Reduce the heat and let the skillet cool slightly before continuing.
Flipping Too Early
What Happens
Pancakes spread, tear, or lose their height.
Why It Happens
The batter hasn’t set enough.
How to Avoid It
Wait until bubbles appear across most of the surface and the edges begin to look dry.
Using Cold Ingredients
What Happens
The batter mixes unevenly and the pancakes don’t rise as well.
Why It Happens
Cold ingredients prevent the batter from blending smoothly.
How to Avoid It
Bring the buttermilk and eggs to room temperature before mixing.
Pressing Down After Flipping
What Happens
The pancakes lose their fluffy interior.
Why It Happens
Pressing forces out the steam that keeps them light.
How to Avoid It
Simply let the pancakes cook undisturbed after flipping.
Guessing the Heat
What Happens
Some pancakes cook perfectly while others burn or stay pale.
Why It Happens
The skillet temperature changes throughout cooking.
How to Avoid It
Adjust the burner as needed and test the surface with a few drops of water between batches.
Skipping the Batter Rest
What Happens
The pancakes don’t rise as high and may cook unevenly.
Why It Happens
The flour hasn’t fully hydrated, and the leavening hasn’t had time to activate.
How to Avoid It
Let the batter rest for about 10 minutes before cooking the first pancake.
Variations
One of the best things about this fluffy buttermilk pancake recipe is how easily it can be adapted. These variations keep the same dependable cooking method while adding different flavors or meeting specific dietary preferences.
Blueberry Buttermilk Pancakes
Fold 1 cup of fresh blueberries into the batter just before cooking.
The berries soften as they cook and add bursts of natural sweetness without changing the light, fluffy texture.
Best served with:
- Warm maple syrup
- Lemon zest
- Powdered sugar
Chocolate Chip Pancakes
Instead of mixing chocolate chips into the batter, sprinkle about 1 tablespoon onto each pancake immediately after pouring the batter onto the skillet.
This keeps the chips evenly distributed and helps prevent them from sinking.
Perfect for weekend breakfasts or special occasions.
Cinnamon Spice Pancakes
Add:
- 1 teaspoon ground cinnamon
- ¼ teaspoon ground nutmeg
to the dry ingredients.
The pancakes develop a warm, comforting flavor that’s especially popular during the fall and holiday season.
Whole Wheat Pancakes
Replace 1 cup of the all-purpose flour with whole wheat flour.
The pancakes become slightly heartier while still remaining tender.
You may need to add an extra tablespoon or two of buttermilk because whole wheat flour absorbs more liquid.
High-Protein Pancakes
Add:
- 1 scoop vanilla whey protein powder
and increase the buttermilk by 2–3 tablespoons if the batter becomes too thick.
The finished pancakes remain soft while providing additional protein for a more filling breakfast.
Gluten-Free Version
Use a quality 1:1 gluten-free baking flour blend designed for baking.
The texture will be slightly different but still soft and fluffy.
Allow the batter to rest for an additional 5 minutes before cooking.
Storage Instructions
Proper storage keeps leftover pancakes soft and makes breakfast much easier on busy mornings.
Room Temperature
Pancakes are best enjoyed immediately after cooking.
If necessary, they can remain at room temperature for up to 2 hours before refrigeration.
Refrigerator
Allow the pancakes to cool completely before storing.
Place parchment paper between each pancake to prevent sticking.
Store in an airtight container.
They’ll stay fresh for 3–4 days.
Freezer
Arrange the cooled pancakes in a single layer on a baking sheet and freeze until firm.
Transfer them to a freezer-safe bag or airtight container with parchment paper between each layer.
Store for up to 2 months.
Best Storage Container
A shallow airtight container works well in the refrigerator.
For freezing, use a heavy-duty freezer bag with as much air removed as possible.
Food Quality Notes
While the pancakes remain safe to eat after storage, they taste best when reheated gently.
Avoid repeated reheating, which can dry them out.
How to Reheat
The best reheating method depends on how many pancakes you’re warming.
Skillet (Recommended)
Heat a lightly buttered skillet over medium-low heat.
Warm each pancake for 1–2 minutes per side.
This method restores the lightly crisp exterior while keeping the center soft and fluffy.
Oven
Arrange the pancakes in a single layer on a baking sheet.
Cover loosely with aluminum foil.
Warm at 325°F (165°C) for 8–10 minutes.
This is the best option when reheating several servings at once.
Toaster
Individual pancakes reheat well in a toaster.
Use a low setting to warm them without over-browning.
Microwave
Place pancakes on a microwave-safe plate and cover them with a slightly damp paper towel.
Heat for 20–30 seconds per pancake.
Although convenient, this method creates a softer exterior than the skillet or oven.
Make-Ahead Instructions
This recipe works well for preparing parts of the breakfast in advance.
The Night Before
Measure and combine all of the dry ingredients.
Store them in an airtight container at room temperature.
Just Before Cooking
Whisk together the wet ingredients and combine them with the dry ingredients.
Allow the batter to rest for 10 minutes before cooking.
This produces the fluffiest pancakes.
Meal Prep Option
Cook the entire batch, cool completely, and refrigerate or freeze individual portions.
Reheat only the amount you’ll serve to keep the remaining pancakes tasting fresh.
Serving Suggestions
These fluffy buttermilk pancakes are satisfying on their own, but the right toppings and side dishes can turn them into a memorable breakfast or brunch. Mix and match these ideas to suit the occasion, whether you’re serving a quick weekday meal or a leisurely weekend spread.
Classic Pancake Toppings
Keep it simple with timeless favorites:
- Warm pure maple syrup
- Soft salted or unsalted butter
- Powdered sugar
- Fresh whipped cream
- Fresh blueberries
- Sliced strawberries
- Banana slices
- Toasted pecans
- Chopped walnuts
Sweet Additions
If you’re serving pancakes for a special breakfast or holiday brunch, try pairing them with:
- Homemade berry compote
- Cinnamon apples
- Fresh peach slices
- Mixed berries
- Honey
- Peanut butter
- Almond butter
- Chocolate hazelnut spread
Each option adds a different flavor while keeping the pancakes as the star of the meal.
Savory Breakfast Sides
Balance the sweetness with classic breakfast proteins.
Great choices include:
- Crispy bacon
- Breakfast sausage links
- Sausage patties
- Scrambled eggs
- Fried eggs
- Cheese omelet
- Breakfast potatoes
- Hash browns
For a larger brunch, include a fresh fruit platter to brighten the meal.
Drinks That Pair Well
These pancakes pair especially well with:
- Freshly brewed coffee
- Cappuccino
- Latte
- Cold milk
- Fresh orange juice
- Apple cider
- Homemade hot chocolate
For brunch, sparkling fruit juice or a light breakfast smoothie also complements the meal nicely.
Frequently Asked Questions
Why are my buttermilk pancakes not fluffy?
The most common causes are overmixing the batter, skipping the resting time, using expired baking powder or baking soda, or cooking over heat that’s too high. Gentle mixing and a 10-minute rest help create a lighter texture.
Can I make these pancakes without buttermilk?
Yes. Mix 2 cups of whole milk with 2 tablespoons of lemon juice or white vinegar and let it stand for about 10 minutes. While cultured buttermilk offers the best flavor and texture, this substitute works well.
Can I freeze homemade pancakes?
Absolutely. Let them cool completely, freeze them in a single layer, then transfer them to a freezer-safe bag with parchment paper between each pancake. They’ll keep well for up to two months.
Should pancake batter be thick?
Yes. A thick batter produces thicker, fluffier pancakes. It should slowly fall from a spoon without running like heavy cream.
Why should I let the batter rest?
Resting allows the flour to absorb the liquid and gives the baking powder and baking soda time to begin creating air bubbles. This leads to softer, taller pancakes.
Can I make the batter the night before?
It’s better to prepare the dry ingredients ahead of time and mix the batter shortly before cooking. Freshly mixed batter gives the leavening agents their best chance to create a light, fluffy texture.
How do I know when it’s time to flip a pancake?
Look for bubbles across most of the surface and edges that begin to appear dry. These visual cues are much more reliable than watching the clock.
What’s the best way to reheat leftover pancakes?
A lightly buttered skillet over medium-low heat provides the best texture. The oven is ideal for larger batches, while the microwave is the quickest option for individual servings.
Key Takeaways
- Rest the batter for 10 minutes to help create tall, fluffy pancakes.
- Mix gently and leave a few small lumps to avoid a tough texture.
- Cook over medium heat and flip only once for even browning.
- Warm maple syrup and softened butter make the best finishing touches.
- Leftover pancakes refrigerate and freeze well, making them perfect for meal prep.
Quick Recipe Summary
These fluffy buttermilk pancakes are made with everyday ingredients and a few simple techniques that help them rise beautifully while staying soft and tender inside. The buttermilk adds a subtle tang and works with the baking soda to create extra lift, while a short batter rest improves texture and consistency. Cooked over medium heat and flipped only once, the pancakes develop a rich golden-brown exterior with a light, airy crumb. They’re ideal for family breakfasts, weekend brunches, and meal prep since leftovers store and reheat exceptionally well.
More Recipes:
- Easy Potato Salad – Great for brunch and picnic meal ideas.
- Ultimate Breakfast Sliders – A savory breakfast option to pair with pancakes.
- Homemade Strawberry Horchata – A refreshing breakfast drink pairing.
- Kentucky Butter Cake – Related homemade baking content.
- Homemade Monkey Butter – A fruit spread that can be served with pancakes.
Useful Links:
- USDA Safe Minimum Internal Temperatures
- USDA Leftovers and Food Storage
- FDA Food Safety During Preparation
- Cooperative Extension Guide to Baking Potatoes
- MyPlate Vegetable Serving Guidance


One Comment