How do you make crispy Korean sticky chicken bites without deep frying?
You make them by using potato starch for a craggy coating, pan-frying in batches, and finishing with a thick, caramelized gochujang glaze that sticks to every bite.
That’s the short answer.
Now here’s exactly how to do it right—and why most recipes get it wrong.
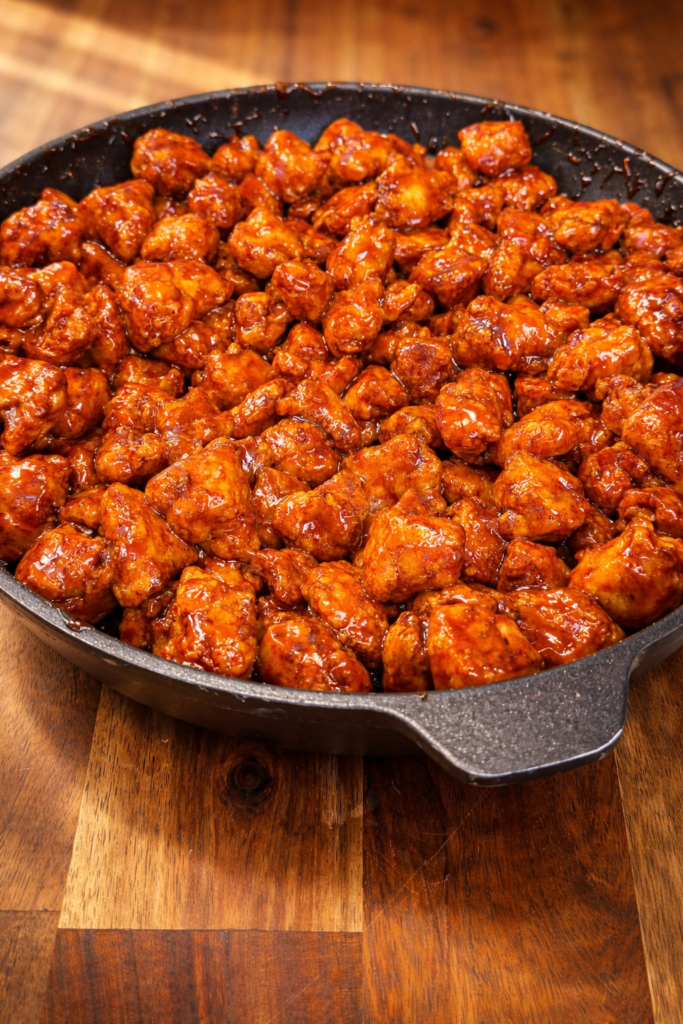
Why This Recipe Works (And Most Don’t)
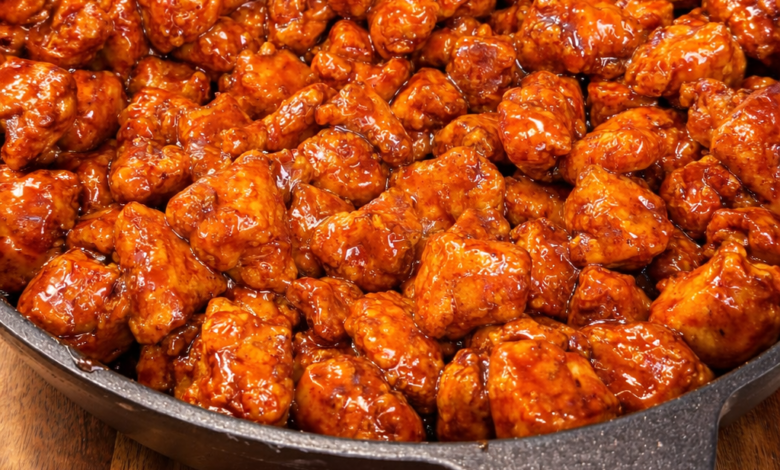
Most “Korean chicken” recipes miss the viral texture you see in the image because they:
- Use cornstarch or flour → creates smooth coating
- Skip the high-heat final toss → sauce doesn’t stick
- Over-marinate → soft, soggy chicken
- Deep fry only → harder, messier, less accessible
👉 This method fixes all of that.
What makes this different:
- Potato starch = crispy, uneven crags
- Pan-frying = faster + less oil
- Thick sauce reduction = deep color + shine
- Final caramelization = restaurant-level coating
Ingredients
Chicken Marinade
- 1.5 lbs boneless, skinless chicken breast (small chunks)
- ½ tsp white pepper
- ½ tsp black pepper
- 1 tsp garlic powder
- 1 tsp onion powder
- 2 tsp minced garlic
- 2 tsp minced ginger
- 3 tbsp soy sauce
- 1 large egg
Coating (Critical Step)
- ~⅓ cup potato starch (NOT all at once)
Korean Sticky Sauce
- ½ cup soy sauce
- ½ cup water
- 2–3 tsp gochujang
- 2 tbsp sugar (or sweetener)
- ¼ cup honey
- 2 tsp garlic
- 1 tsp ginger
- 1 tsp vinegar
- 1 tbsp cornstarch + 2 tbsp water (slurry)
Finish
- Sesame seeds
- Sliced green onions
Step-by-Step: Crispy Korean Chicken Bites
1. Marinate (Short + Strategic)
Mix everything and marinate for 15–20 minutes only.
Why it matters:
- Longer marinade = breaks down texture
- Short marinade = keeps chicken firm → better crisp
2. Coat for “Craggy” Texture
Lightly toss chicken with potato starch until evenly coated.
What you want:
- Thin coating
- Patchy coverage
- Rough surface
What to avoid:
- Thick batter
- Smooth coating
👉 This step creates that viral crispy texture.
3. Pan-Fry (No Deep Fryer Needed)
Cook in hot oil, in batches, until golden and slightly rough.
Instructions:
- Heat ½–1 inch of oil in a wide pan (medium-high)
- Add chicken in batches (don’t overcrowd)
- Fry 4–6 minutes, turning occasionally
- Remove when:
- Golden brown
- Crispy edges (not smooth)
Let it rest on a rack or paper towel.
4. Make the Sticky Korean Sauce
Simmer, reduce, then thicken.
Steps:
- Add everything (except the slurry) to a pan
- Simmer 3–5 minutes
- Let it reduce slightly (deepens color)
- Add slurry
- Cook until thick and glossy
You’re looking for:
- Sauce coats a spoon heavily
- Deep reddish-brown color
- Sticky, not watery
5. Final Toss (MOST IMPORTANT STEP)
High heat + bubbling sauce = perfect coating.
Steps:
- Add chicken back into the sauce
- Toss on high heat
- Let the sauce bubble and cling
👉 This creates:
- Sticky glaze
- Caramelized coating
- That glossy finish from the image
Smooth vs Craggy Coating (Why It Matters)
Smooth Coating (Wrong)
- Caused by: flour or thick batter
- Result:
- Even surface
- Less crunch
- Sauce slides off
Craggy Coating (Correct)
- Caused by: potato starch + light toss
- Result:
- Rough edges
- More crunch
- Sauce grips better
👉 More surface area = more flavor + texture
Sauce Thickness Stages (Visual Guide)
Stage 1 – Thin:
Looks watery, runs off spoon → NOT ready
Stage 2 – Lightly Thickened:
Coats spoon lightly → still too thin
Stage 3 – Perfect:
- Glossy
- Thick
- Slow-moving
👉 This is when you add the chicken.
Why Your Sauce Isn’t Sticking (Fix This Fast)
If your sauce isn’t coating the chicken, here’s why:
Problem → Fix
- Sauce too thin → Reduce longer before slurry
- Chicken too wet → Let it rest after frying
- Heat too low → Use high heat for final toss
- Coating too smooth → Use less starch, not more
- Skipped caramelization → Let sauce bubble on chicken
Pro Tips (Game-Changing Results)
- Use potato starch only → not optional
- Fry in batches → prevents soggy chicken
- Don’t rush the sauce → reduction = flavor
- Use a wide pan → better caramelization
- Toss aggressively → helps sauce cling
Ingredient Swaps (Flexible + Practical)
- No gochujang → use sriracha + a little miso
- No potato starch → cornstarch (less crispy)
- Chicken thighs → juicier, slightly less crisp
- Honey → maple syrup (different flavor, still works)
- Sugar-free → use monk fruit or erythritol
Serving Ideas (Make It a Full Meal)
- White rice or fried rice
- Noodles
- Lettuce wraps
- Steamed broccoli
👉 Want a similar bold-flavor dish? Try this:
Internal Flavor Pairing Ideas
If you love this recipe, you’ll also enjoy:
- Crispy Korean Popcorn Chicken – Sweet, Spicy & Addictive!
- Healthy Crispy Korean Fried Chicken (High-Protein & Easy)
- Korean BBQ Meatballs: A Flavorful Twist on Classic Comfort Food
👉 These help build topical authority around Asian-style chicken recipes.
FAQs
Can I make this without frying?
Yes, but texture changes. Pan-frying gives the best crisp without deep frying.
Is potato starch better than cornstarch?
Yes. Potato starch creates a crispier, more jagged coating, which holds sauce better.
Can I air fry this?
Yes, but:
- Spray lightly with oil
- Cook at 400°F
- Texture will be slightly less craggy
How do I keep chicken crispy after saucing?
Serve immediately. The longer it sits, the softer it gets.
Can I make it less spicy?
Yes—reduce or skip gochujang and increase honey slightly.
If you want viral-level crispy Korean chicken bites, focus on these 4 things:
- Short marinade (15–20 min)
- Potato starch = craggy texture
- Pan-fry in batches
- High-heat caramelization with thick sauce
👉 That final toss is the difference between:
“good chicken” vs “restaurant-quality sticky perfection.”