Quick Answer
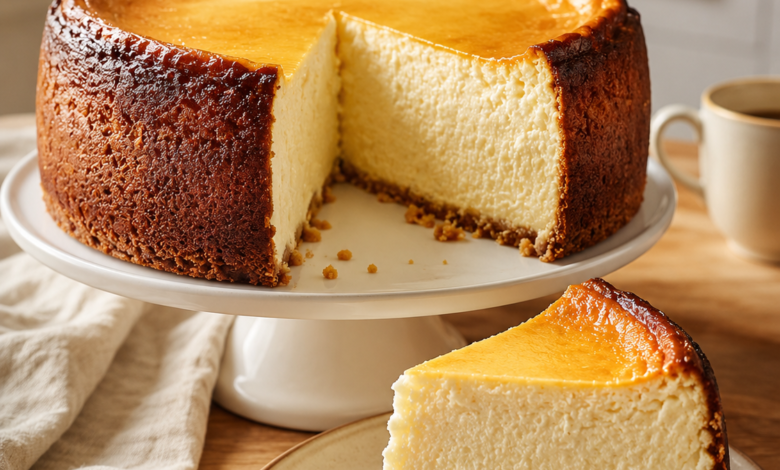
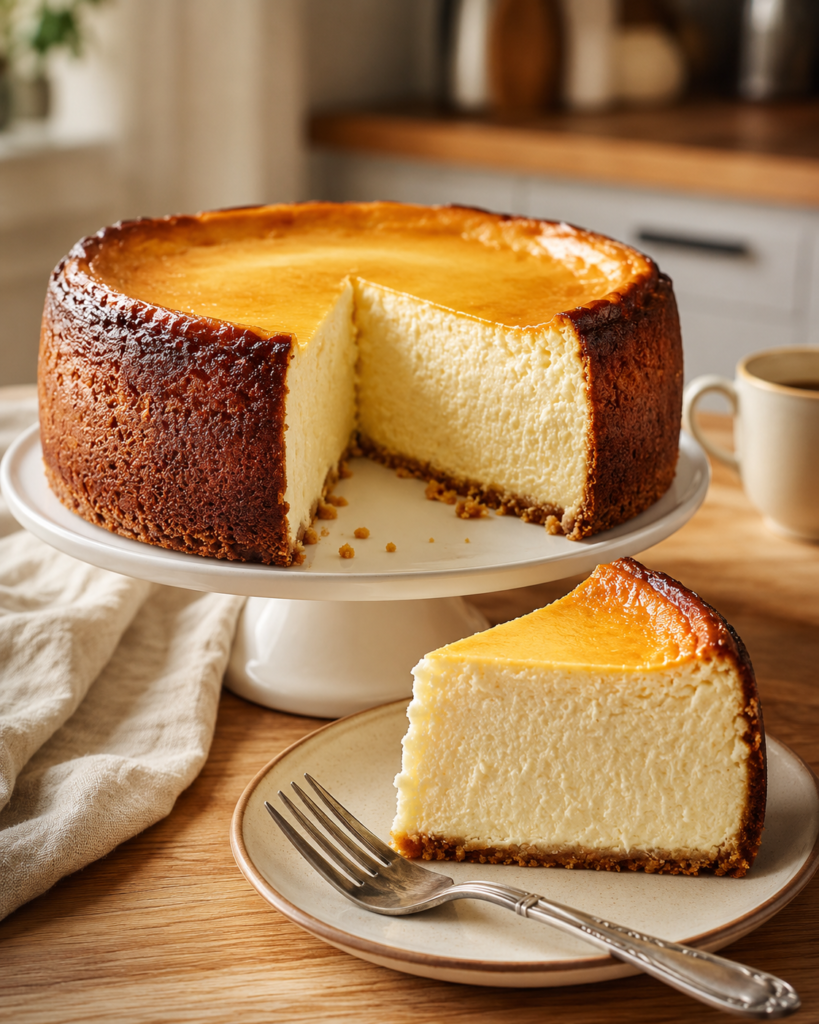
New York Style Cream Cheese Cheesecake is a rich, dense baked dessert made with full-fat cream cheese, eggs, sour cream, and a buttery graham cracker crust. This version delivers a smooth, creamy filling, beautifully caramelized edges, and reliable results with straightforward techniques that home bakers can confidently follow for holidays, celebrations, or whenever a classic cheesecake is on the menu.
New York Style Cream Cheese Cheesecake Recipe
There’s something timeless about a well-made New York Style Cream Cheese Cheesecake. It isn’t overloaded with toppings or unnecessary extras—the creamy filling is the real star. Every bite is smooth, rich, and balanced by a lightly buttery graham cracker crust that adds just enough texture without competing with the filling.
This recipe focuses on techniques that consistently produce excellent results rather than shortcuts. From using room-temperature ingredients to cooling the cheesecake gradually, each step helps create the dense yet velvety texture people expect from a classic New York cheesecake while minimizing common baking problems.
Whether you’re preparing dessert for Thanksgiving, Christmas, a birthday celebration, or simply want a homemade treat to enjoy throughout the week, this cheesecake is a dependable choice that looks impressive without requiring professional baking experience.
If you enjoy classic homemade desserts, you may also like Homemade Dessert Recipes.
Why This Recipe Works
Many cheesecake recipes rely on complicated techniques or unnecessary ingredients. This version keeps things simple while preserving the qualities that define an authentic New York-style cheesecake.
Full-Fat Cream Cheese Creates the Signature Texture
Using full-fat cream cheese provides the dense, silky consistency that makes New York cheesecake instantly recognizable. Reduced-fat versions contain more moisture and stabilizers, which can affect both texture and flavor.
Sour Cream Adds Smoothness Without Making the Filling Heavy
A modest amount of sour cream softens the richness of the cream cheese while contributing a subtle tang. The result is a filling that feels luxurious without becoming overly dense.
A Small Amount of Flour Improves Stability
Rather than making the cheesecake cakey, a little flour helps support the filling as it bakes. This creates clean slices while maintaining a creamy interior.
Gentle Mixing Helps Prevent Cracks
Once the eggs are added, mixing only until everything is combined minimizes excess air in the batter. Less trapped air means the cheesecake bakes more evenly and is less likely to puff dramatically before collapsing.
Slow Cooling Improves Texture
One of the biggest differences between an average cheesecake and a bakery-quality one happens after it leaves the oven. Allowing the cheesecake to cool gradually helps reduce sudden temperature changes, improving both the appearance and the final texture.
Chilling Overnight Makes a Noticeable Difference
Although it’s tempting to serve cheesecake as soon as it cools, an overnight rest in the refrigerator allows the filling to fully set and the flavors to develop. The slices become firmer, cleaner, and even creamier.
Designed for Home Bakers
Every ingredient is easy to find in a typical American grocery store, and the method doesn’t require advanced baking skills. The instructions focus on visual cues and practical guidance so you can recognize each stage with confidence instead of relying on timing alone.
The ingredients themselves are straightforward, but choosing and preparing them correctly has a big impact on the finished cheesecake. In the next section, you’ll find everything you need, along with a few notes that help ensure the smoothest batter and best possible texture.
Recipe Summary
| Recipe Information | Details |
|---|---|
| Prep Time | 30 minutes |
| Bake Time | 70–75 minutes |
| Cooling Time | 5 hours (minimum) |
| Total Time | About 6 hours 45 minutes |
| Servings | 12 slices |
| Course | Dessert |
| Cuisine | American |
| Difficulty | Intermediate |
| Calories | Approximately 520 per slice |
Ingredients
Graham Cracker Crust
- 2 cups graham cracker crumbs
- ¼ cup granulated sugar
- ½ teaspoon kosher salt
- ½ cup unsalted butter, melted
Cream Cheese Filling
- 32 ounces (4 blocks) full-fat cream cheese, softened
- 1¼ cups granulated sugar
- 2 tablespoons all-purpose flour
- 1 cup full-fat sour cream, at room temperature
- 4 large eggs, at room temperature
- 2 teaspoons pure vanilla extract
- 1 tablespoon fresh lemon juice
- ¼ teaspoon kosher salt
Ingredient Notes
Using quality ingredients and preparing them properly makes a noticeable difference in both texture and flavor. Here are a few details that help ensure success before you begin mixing.
Cream Cheese
Use full-fat block cream cheese rather than whipped or spreadable varieties. Let it sit at room temperature for about an hour so it blends into a perfectly smooth filling without lumps.
Eggs
Room-temperature eggs mix into the batter much more evenly than cold eggs. They also help reduce overmixing, which can introduce excess air and increase the risk of cracks.
Sour Cream
Full-fat sour cream contributes a subtle tang while softening the richness of the cream cheese. Reduced-fat versions contain more moisture and may slightly change the finished texture.
Graham Cracker Crumbs
Fine, evenly crushed crumbs create a crust that presses together firmly and slices cleanly. If crushing whole crackers, aim for a sand-like consistency.
Butter
Unsalted butter gives you complete control over seasoning while helping the crust bake into a crisp, sturdy base that supports the dense filling.
Vanilla Extract
Choose pure vanilla extract for the most balanced flavor. Since cheesecake contains only a handful of ingredients, the quality of the vanilla is easy to notice.
Lemon Juice
A small amount of fresh lemon juice brightens the filling without making it taste lemony. It simply enhances the natural flavor of the cream cheese.
Flour
Only a small amount is needed. It gently stabilizes the filling so the cheesecake slices neatly while still maintaining its signature creamy texture.
Equipment
You don’t need specialty bakery equipment to make this cheesecake successfully. A few dependable kitchen tools are all that’s required.
- 9-inch springform pan
- Parchment paper
- Large mixing bowl
- Electric hand mixer or stand mixer
- Rubber spatula
- Measuring cups
- Measuring spoons
- Fine mesh sieve (optional, for perfectly smooth batter)
- Baking sheet (to catch any butter from the crust)
- Cooling rack
- Thin offset spatula or butter knife for loosening the edges
- Sharp chef’s knife for slicing
How to Make New York Style Cream Cheese Cheesecake
The key to a bakery-quality cheesecake isn’t complicated techniques—it’s taking your time and paying attention to what the batter and cheesecake look like at each stage. Follow these steps, and you’ll be rewarded with a rich, creamy cheesecake that slices beautifully.
Step 1: Prepare the Pan and Oven
Preheat your oven to 325°F (163°C).
Lightly grease a 9-inch springform pan and line the bottom with a circle of parchment paper. This makes removing the finished cheesecake much easier while protecting the crust.
Place the springform pan on a baking sheet to catch any butter that may seep from the crust during baking.
Success looks like: The pan is lightly coated, the parchment lies flat, and the oven has reached the correct temperature before you begin mixing.
Step 2: Make the Graham Cracker Crust
In a medium bowl, combine the graham cracker crumbs, sugar, kosher salt, and melted butter until every crumb is evenly coated.
The mixture should resemble damp sand and hold together when squeezed between your fingers.
Press it firmly and evenly into the bottom of the prepared springform pan using the bottom of a measuring cup or drinking glass. Avoid packing it too tightly around the edges.
Bake for 10 minutes, then transfer the pan to a cooling rack and allow the crust to cool while you prepare the filling.
Success looks like: The crust is lightly golden, smells buttery, and feels firm rather than loose.
If the crust crumbles: It likely needs a little more pressure when pressing it into the pan or wasn’t mixed evenly with the butter.
Step 3: Beat the Cream Cheese Until Completely Smooth
Place the softened cream cheese in a large mixing bowl.
Beat on medium speed for about 2 to 3 minutes, stopping occasionally to scrape down the sides and bottom of the bowl with a rubber spatula.
Take your time with this step. A smooth cream cheese base is the foundation of a silky cheesecake.
Success looks like: The mixture is creamy, glossy, and completely free of visible lumps.
Warning sign: If you still see small white lumps, the cream cheese was probably too cold. Continue mixing until smooth before adding anything else.
Step 4: Add the Sugar and Flour
Add the granulated sugar and flour to the cream cheese.
Mix on low speed just until everything is fully incorporated. Scrape the bowl again to ensure there are no pockets of unmixed ingredients.
The batter should remain thick and smooth.
Success looks like: The mixture has a silky consistency without becoming runny.
Avoid beating longer than necessary, as excessive mixing introduces unnecessary air.
Step 5: Add the Sour Cream, Eggs, and Flavorings
Mix in the sour cream until fully blended.
Add the eggs one at a time, mixing on low speed after each addition until the yolk disappears before adding the next egg.
Finally, stir in the vanilla extract, fresh lemon juice, and salt.
Continue mixing only until everything is evenly combined.
Success looks like: The batter is smooth, creamy, and pours slowly from the spatula without visible streaks.
Warning sign: If the batter looks foamy or filled with bubbles, it has been overmixed. A few gentle taps on the counter can help release larger air pockets.
Step 6: Fill the Pan
Pour the cheesecake batter onto the cooled crust.
Use an offset spatula or the back of a spoon to smooth the top into an even layer.
Gently tap the pan on the countertop several times to release trapped air bubbles.
Success looks like: The surface is level with only a few tiny bubbles visible.
A smooth surface now often leads to a smoother finished cheesecake after baking.
Step 7: Bake Until Just Set
Place the cheesecake on the center oven rack.
Bake for 70 to 75 minutes.
Avoid opening the oven during the first hour, as sudden temperature changes can affect how the cheesecake sets.
The exact baking time may vary slightly depending on your oven.
Success looks like:
- The edges appear fully set.
- The center still has a gentle 2- to 3-inch wobble when the pan is lightly shaken.
- The top develops a light golden color with naturally darker caramelized edges.
Warning sign: If the entire cheesecake jiggles like liquid, it needs more baking time.
Another warning sign: If the top begins to puff dramatically or crack before the baking time is complete, the oven may be running too hot.
Step 8: Cool the Cheesecake Gradually
Turn off the oven and crack the oven door open a few inches.
Leave the cheesecake inside for 1 hour.
This gradual cooling process helps reduce sudden temperature changes that can lead to cracks.
After an hour, remove the cheesecake and place it on a wire rack to cool completely at room temperature.
Once cooled, cover loosely and refrigerate for at least 4 hours, although overnight chilling produces the best flavor and texture.
Success looks like: The cheesecake settles naturally while remaining mostly level across the top.
Step 9: Slice and Serve
Run a thin knife around the inside edge of the springform pan before releasing the ring.
For the cleanest slices, dip a sharp knife into hot water, wipe it dry, and clean the blade between each cut.
Serve the cheesecake chilled on its own or with your favorite fruit topping or sauce.
Success looks like: Each slice holds its shape, reveals a dense yet creamy interior, and cuts cleanly without sticking excessively to the knife.
Chef Tips
A few small adjustments can make the difference between a good cheesecake and one that looks and tastes like it came from a bakery. These practical tips focus on texture, appearance, and consistency without adding unnecessary complexity.
1. Start with Truly Room-Temperature Ingredients
Cream cheese, eggs, and sour cream should all be at room temperature before mixing. They blend together more easily, creating a smooth batter with fewer lumps and less need for extra mixing.
2. Scrape the Bowl Often
Cream cheese tends to cling to the sides and bottom of the mixing bowl. Stop several times during mixing to scrape everything down with a rubber spatula so every ingredient is fully incorporated.
3. Mix on Low Speed After Adding the Eggs
Once the eggs go into the batter, keep the mixer on low speed and mix only until each egg disappears. This helps minimize trapped air, which can cause the cheesecake to puff and crack during baking.
4. Don’t Skip the Cooling Period
Leaving the cheesecake in the turned-off oven with the door slightly open allows the temperature to drop gradually. This simple step helps reduce sudden shrinking and improves the final texture.
5. Chill Overnight Whenever Possible
Although four hours of chilling will set the cheesecake, an overnight rest produces noticeably cleaner slices and a richer, more developed flavor.
6. Tap the Pan Before Baking
After pouring the filling into the crust, gently tap the pan on the counter a few times. This releases large air bubbles that could otherwise leave small holes in the finished cheesecake.
7. Slice with a Warm Knife
Dip a sharp knife into hot water, wipe it dry, and clean it between every cut. Warm blades glide through the filling more cleanly and keep each slice looking neat.
8. Avoid Opening the Oven Too Early
Frequent temperature changes during baking can affect how evenly the cheesecake sets. Resist the urge to check on it during the first hour unless absolutely necessary.
9. Bake Until the Center Still Wobbles
The middle should gently jiggle when the pan is lightly shaken, while the edges remain set. The residual heat continues cooking the cheesecake as it cools.
10. Remove the Springform Ring Carefully
Run a thin knife around the edge before releasing the springform latch. This helps prevent the sides from tearing if the cheesecake has lightly adhered to the pan.
Common Mistakes to Avoid
Even experienced bakers occasionally run into cheesecake problems. Fortunately, most of them are easy to prevent once you know what to watch for.
Using Cold Cream Cheese
What happens: The batter becomes lumpy and difficult to smooth.
Why it happens: Cold cream cheese doesn’t blend evenly with the other ingredients.
How to avoid it: Let the cream cheese soften at room temperature for about an hour before mixing.
How to fix it: Continue beating until smooth before adding any additional ingredients.
Overmixing the Batter
What happens: The cheesecake may rise too much, then sink or crack as it cools.
Why it happens: Too much air becomes trapped in the filling.
How to avoid it: Mix on low speed after adding the eggs and stop as soon as everything is combined.
How to fix it: Minor cracks can be covered with fruit or sauce, but preventing excess air is the better solution.
Overbaking the Cheesecake
What happens: The texture becomes dry, dense, or crumbly.
Why it happens: Baking continues until the center is completely firm in the oven.
How to avoid it: Remove the cheesecake when only the center still has a gentle wobble.
How to fix it: Unfortunately, an overbaked cheesecake cannot regain its original creamy texture.
Removing the Cheesecake Too Quickly
What happens: Large cracks may develop across the surface.
Why it happens: Sudden temperature changes cause the cheesecake to contract too rapidly.
How to avoid it: Let it cool gradually in the turned-off oven before transferring it to a cooling rack.
How to fix it: Decorative toppings can disguise cracks, but slow cooling usually prevents them.
Skipping the Chill Time
What happens: The filling feels soft and slices poorly.
Why it happens: The cheesecake hasn’t had enough time to fully set.
How to avoid it: Refrigerate for at least four hours, preferably overnight.
How to fix it: Return the cheesecake to the refrigerator until thoroughly chilled.
Pressing the Crust Too Firmly
What happens: The crust becomes overly hard and difficult to cut.
Why it happens: Excessive pressure compacts the crumbs too tightly.
How to avoid it: Press the crust firmly enough to hold together without compressing it excessively.
How to fix it: There isn’t a practical fix after baking, so aim for even, moderate pressure during preparation.
Releasing the Springform Ring Too Soon
What happens: The sides can tear or stick to the pan.
Why it happens: The cheesecake hasn’t completely cooled and firmed up.
How to avoid it: Wait until the cheesecake has fully chilled before removing the ring.
How to fix it: Run a thin knife around the edge before gently releasing the latch.
Variations
Once you’ve mastered the classic version, it’s easy to customize this cheesecake while keeping its signature creamy texture.
Lemon New York Cheesecake
Increase the lemon juice to 2 tablespoons and add 1 teaspoon of finely grated lemon zest. The filling becomes brighter and slightly more refreshing while remaining rich and creamy.
Chocolate Cheesecake
Fold 6 ounces of melted, cooled dark chocolate into the finished batter before pouring it into the crust. The texture stays dense, while the flavor becomes deeply chocolatey.
Fresh Berry Cheesecake
Serve the chilled cheesecake with fresh strawberries, blueberries, raspberries, or blackberries and a simple berry sauce. Adding the fruit just before serving keeps the crust crisp.
Salted Caramel Cheesecake
Drizzle cooled slices with homemade or store-bought salted caramel sauce immediately before serving. The sweet-salty contrast complements the tanginess of the cream cheese without overwhelming it.
Gluten-Free Version
Replace the graham cracker crumbs with certified gluten-free cookie crumbs or gluten-free graham-style crackers. The filling remains unchanged, and the finished cheesecake keeps its signature texture.
Mini Cheesecakes
Prepare the recipe in a lined muffin pan for individual servings. Reduce the baking time to approximately 18–22 minutes, baking until the centers still jiggle slightly before cooling and chilling as directed.
Storage Instructions
Proper storage helps preserve the cheesecake’s smooth texture and rich flavor. Because this dessert is made with dairy and eggs, it should always be refrigerated once it has cooled.
Room Temperature
Cheesecake can safely sit at room temperature for up to 2 hours while serving.
If the room is especially warm, return it to the refrigerator sooner to maintain both food safety and texture.
Refrigerator
Cover the cheesecake tightly with plastic wrap or place it in an airtight cake container.
It will stay fresh for up to 5 days.
For the best texture, keep the cheesecake away from foods with strong odors since cream cheese can absorb surrounding flavors.
Freezer
Cheesecake freezes remarkably well.
Wrap the whole cheesecake or individual slices tightly in plastic wrap, followed by a layer of aluminum foil, or place them in freezer-safe airtight containers.
Freeze for up to 2 months.
To serve, thaw overnight in the refrigerator. Avoid thawing at room temperature, which can affect both texture and food safety.
Best Storage Container
- Airtight cake carrier
- Large airtight food container
- Springform pan covered tightly with plastic wrap and foil
Food Quality Notes
- Overnight chilling improves flavor and texture.
- Repeated warming and cooling can soften the filling.
- Freeze only once for the best quality.
- Keep toppings separate until serving whenever possible.
Since This Recipe Is Served Chilled
Unlike casseroles or baked dinners, this cheesecake is not intended to be reheated.
If serving directly from the refrigerator, let individual slices sit at room temperature for 15–20 minutes. This allows the filling to soften slightly and brings out its rich, creamy flavor without compromising texture.
If the cheesecake has been frozen, thaw it overnight in the refrigerator before serving.
Make-Ahead Instructions
This recipe is an excellent make-ahead dessert because both the flavor and texture improve after chilling.
One Day Ahead
Bake the cheesecake, cool it completely, and refrigerate overnight.
Many bakers find the cheesecake slices more cleanly and tastes even better the next day.
Two Days Ahead
You can prepare the cheesecake up to 2 days before serving.
Keep it covered in the refrigerator and wait to add any fruit, caramel, chocolate, or whipped cream until just before serving.
Freezing Ahead
If preparing for a holiday or special event, bake the cheesecake several weeks in advance.
Freeze it well wrapped, then thaw overnight in the refrigerator the day before serving.
Serving Suggestions
This classic cheesecake is delicious on its own, but a few simple accompaniments can make it even more memorable.
Fresh Fruit
Fresh strawberries, raspberries, blueberries, or blackberries add a bright contrast to the rich filling.
Fruit Sauces
Top each slice with:
- Strawberry sauce
- Blueberry compote
- Raspberry sauce
- Cherry topping
Serve the sauce on the side so everyone can choose their favorite amount.
Caramel or Chocolate
A light drizzle of salted caramel or dark chocolate sauce complements the creamy filling without overpowering it.
Whipped Cream
A small dollop of freshly whipped cream adds a light, airy contrast to the dense cheesecake.
Coffee and Tea
Pair this dessert with:
- Freshly brewed coffee
- Espresso
- Cappuccino
- Black tea
- Earl Grey
- Chai tea
Holiday Dessert Table
This cheesecake pairs beautifully with:
- Fresh fruit platters
- Cookies
- Brownies
- Mini dessert bars
- Seasonal pies
Frequently Asked Questions
Can I make this cheesecake the day before serving?
Yes. In fact, making it a day ahead often improves both the flavor and texture because the filling has more time to fully set.
Why did my cheesecake crack?
Cracks are usually caused by overmixing, overbaking, or cooling too quickly. Mixing gently and allowing the cheesecake to cool gradually helps minimize cracking.
Can I freeze leftover cheesecake?
Absolutely. Wrap individual slices or the whole cheesecake well and freeze for up to 2 months. Thaw overnight in the refrigerator before serving.
Do I need a water bath?
No. This recipe is designed to produce excellent results without one. Careful mixing and gradual cooling help achieve a smooth, creamy texture.
Why is my cheesecake still soft after baking?
The center should still wobble slightly when removed from the oven. It continues to set while cooling and firms completely after several hours in the refrigerator.
Can I use low-fat cream cheese?
Full-fat cream cheese produces the richest texture and best structure. Low-fat versions can make the filling softer and less creamy.
How do I get perfectly clean slices?
Use a sharp knife dipped in hot water, wipe it dry after each cut, and repeat between slices.
Can I add toppings before baking?
It’s best to bake the cheesecake plain. Add fruit, sauces, or whipped cream after chilling to preserve the smooth surface and classic texture.
Key Takeaways
- Use room-temperature ingredients for the smoothest, creamiest filling.
- Bake until the edges are set while the center still has a gentle wobble.
- Cool gradually, then chill overnight for the best texture.
- Full-fat cream cheese creates the rich, dense consistency that defines New York-style cheesecake.
- Store refrigerated for up to 5 days or freeze for up to 2 months for longer storage.
Quick Recipe Summary
New York Style Cream Cheese Cheesecake is a classic American dessert known for its dense, velvety filling and buttery graham cracker crust. This recipe uses full-fat cream cheese, sour cream, eggs, and a gentle baking method to create a smooth texture with lightly caramelized edges and clean slices. Room-temperature ingredients, minimal mixing after adding the eggs, gradual cooling, and overnight chilling all contribute to reliable results. Whether served plain or topped with fresh berries, fruit sauce, caramel, or whipped cream, this cheesecake is an elegant make-ahead dessert that’s perfect for holidays, birthdays, family gatherings, or any occasion that calls for a timeless homemade treat.
More Recipes:
- Homemade Dessert Recipes
- Best Cheesecake Recipes
- Easy Orange Creamsicle Cheesecake (Creamy & Refreshing)
- This Butter-Soaked Pound Cake Is Insanely Moist (Bakery Secret Inside!)
- This Viral Strawberry Crunch Cake Is Dangerously Addictive (Easy Poke Cake!)
Useful Links:
- Safe Refrigeration and Food Storage Guidelines
- FDA – Refrigerating Dairy-Based Desserts
- King Arthur Baking – Cheesecake Baking Tips
- Cooperative Extension – Baking Ingredient Basics