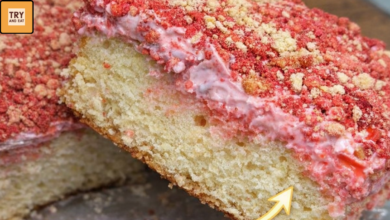
How Do You Make Red Velvet Cookies & Cream Cheesecake Brownies?
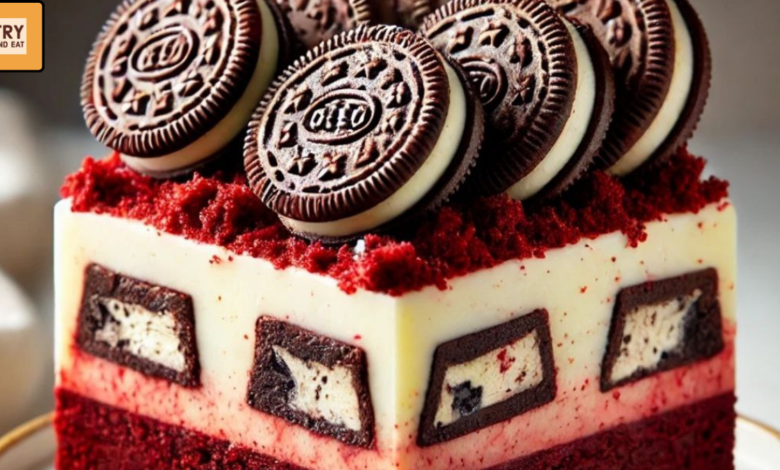
Red Velvet Cookies & Cream Cheesecake Brownies are made by layering a fudgy red velvet brownie base with a smooth cheesecake filling, then topping it with crushed sandwich cookies before baking. The result is a rich, multi-layered dessert with bold color, creamy texture, and crunchy cookie contrast.
This recipe combines three classics—red velvet cake, cheesecake, and cookies & cream brownies—into one sliceable show-stopper.

What Makes This Dessert Special?
Short answer: It delivers three textures and flavors in every bite.
- Fudgy brownie base with cocoa depth and signature red velvet color
- Creamy cheesecake layer that adds tangy richness
- Cookies & cream topping for crunch and sweetness
It’s ideal for birthdays, holidays, potlucks, or anytime you want a visually impressive dessert.
Ingredients (Makes 12–16 Bars)
For the Red Velvet Brownie Base
- 1 cup (2 sticks) unsalted butter, melted
- 2 cups granulated sugar
- 4 large eggs
- 2 teaspoons vanilla extract
- 1 tablespoon red food coloring
- 1/3 cup unsweetened cocoa powder
- 1 1/2 cups all-purpose flour
- 1/4 teaspoon salt
For the Cheesecake Layer
- 16 oz cream cheese, softened
- 1 cup powdered sugar
- 1 teaspoon vanilla extract
- 2 large eggs
For the Cookies & Cream Topping
- 10–12 sandwich cookies (such as chocolate cream-filled cookies), crushed
Step-by-Step Instructions
1. Prepare the Pan and Oven
- Preheat oven to 350°F.
- Line a 9×13-inch baking pan with parchment paper.
- Lightly grease for easy removal.
2. Make the Red Velvet Brownie Layer
Direct answer: Mix wet ingredients first, then fold in dry ingredients gently.
- Whisk melted butter and sugar until smooth.
- Add eggs one at a time, mixing well after each.
- Stir in vanilla and red food coloring.
- Sift in cocoa powder, flour, and salt.
- Fold until just combined—do not overmix.
Spread evenly in the prepared pan.
Tip: Overmixing develops gluten and can make brownies dense instead of fudgy.
3. Prepare the Cheesecake Layer
- Beat softened cream cheese until smooth.
- Add powdered sugar and vanilla; mix well.
- Add eggs and beat just until combined (avoid overbeating).
Pour cheesecake mixture evenly over the brownie base.
4. Add the Cookies & Cream Topping
- Crush cookies into small chunks (not fine crumbs).
- Sprinkle evenly over the cheesecake layer.
- Gently press them down so they adhere during baking.
5. Bake
- Bake for 35–40 minutes, until:
- Edges are lightly golden
- Center has a slight jiggle but is mostly set
Do not overbake—the cheesecake layer will continue setting as it cools.
6. Cool and Chill
- Cool completely at room temperature.
- Refrigerate for at least 2 hours before slicing.
Chilling ensures clean, defined layers.
Why This Recipe Works
- Balanced sweetness: The tangy cheesecake offsets the sweet brownie base.
- Textural contrast: Creamy middle + fudgy base + crunchy topping.
- Structured layers: Proper chilling prevents messy slices.
Each layer complements the others without overpowering the overall flavor.
Expert Tips for Perfect Results
- Use room-temperature cream cheese to prevent lumps.
- Sift cocoa powder to avoid dry pockets.
- For sharp slices, use a warm knife and wipe clean between cuts.
- If the top browns too quickly, tent loosely with foil during baking.
Serving Suggestions
- Serve chilled for the best texture.
- Add a scoop of vanilla ice cream for contrast.
- Drizzle with melted chocolate for extra richness.
- Dust lightly with powdered sugar for presentation.
Storage Instructions
Refrigerator
Store in an airtight container for up to 5 days.
Freezer
- Wrap individual slices tightly in plastic wrap and foil.
- Freeze up to 2 months.
- Thaw overnight in the refrigerator before serving.
Frequently Asked Questions
Can I use boxed red velvet mix?
Yes, but homemade batter provides better texture and flavor control.
How do I know when it’s done?
The center should jiggle slightly but not look wet. Edges will appear set.
Can I swirl the layers?
Yes. Reserve 1/2 cup of brownie batter and swirl it into the cheesecake layer before baking.
Why do I need to chill it?
Chilling allows the cheesecake to fully firm up, ensuring clean cuts and defined layers.
Key Takeaways
- This dessert layers red velvet brownie, cheesecake, and cookies & cream topping.
- Bake at 350°F for 35–40 minutes until just set.
- Chill at least 2 hours before slicing.
- Use room-temperature cream cheese for a smooth layer.
- Store refrigerated up to 5 days or freeze for 2 months.
Red Velvet Cookies & Cream Cheesecake Brownies combine bold color, creamy richness, and cookie crunch in one unforgettable dessert. With clear layers and balanced flavor, they’re an impressive yet approachable treat for any celebration.