What Is the Best Vanilla Layer Cake with Chocolate Buttercream Recipe?
This vanilla layer cake with chocolate buttercream combines tender buttermilk cake layers with rich cocoa frosting. The result is a moist, bakery-style celebration cake that’s perfect for birthdays, holidays, and special occasions while remaining simple enough for home bakers.
A great vanilla layer cake should be soft, buttery, moist, and flavorful. This recipe achieves all four goals by combining butter, extra egg yolks, buttermilk, and pure vanilla extract. Finished with a rich chocolate buttercream, it delivers the classic cake-and-frosting combination most people love.
You May Also Like:
Butter Pecan Cake Recipe

Why This Recipe Works
Vanilla extract provides warmth and depth while butter contributes richness. Buttermilk adds a subtle tang that balances sweetness.
Extra egg yolks add fat, tenderness, and structure. Proper creaming incorporates air, creating a lighter crumb.
Ingredient Purpose
- Flour provides structure.
- Butter creates richness.
- Sugar aids tenderness and moisture retention.
- Eggs provide stability.
- Buttermilk creates softness.
- Cocoa powder delivers chocolate flavor.
Recipe Card
Prep Time: 30 minutes
Cook Time: 30 minutes
Total Time: 1 hour
Servings: 12–14 slices
Calories: Approximately 720 per slice
Cuisine: American
Course: Dessert
Ingredients
Vanilla Cake
- 3 cups all-purpose flour
- 2½ tsp baking powder
- ½ tsp baking soda
- 1 tsp salt
- 1 cup unsalted butter, softened
- 2 cups granulated sugar
- 4 large eggs
- 2 egg yolks
- 1 tbsp vanilla extract
- 1¼ cups buttermilk
- ¼ cup whole milk
Chocolate Buttercream
- 2 cups unsalted butter, softened
- 1 cup unsweetened cocoa powder
- 6 cups powdered sugar
- ½ cup heavy cream
- 2 tsp vanilla extract
- ¼ tsp salt
Equipment Needed
- Three 8-inch cake pans
- Stand mixer or hand mixer
- Mixing bowls
- Measuring cups
- Cooling rack
- Offset spatula
- Cake turntable (optional)
Step-by-Step Instructions
Step 1: Prepare the Pans
Preheat oven to 350°F.
Grease and line three cake pans.
Why it matters:
Prevents sticking and ensures clean release.
Common mistake:
Skipping parchment paper.
Step 2: Mix Dry Ingredients
Whisk flour, baking powder, baking soda, and salt.
Why it matters:
Ensures even distribution of leavening.
Step 3: Cream Butter and Sugar
Beat for 4–5 minutes.
Why it matters:
Creates air pockets for a fluffy cake.
Common mistake:
Stopping too early.
Step 4: Add Eggs
Add eggs individually, followed by yolks.
Why it matters:
Maintains a stable batter.
Step 5: Add Vanilla
Mix until combined.
Step 6: Alternate Wet and Dry Ingredients
Alternate flour mixture and buttermilk mixture.
Why it matters:
Prevents overmixing.
Common mistake:
Mixing too aggressively.
Step 7: Bake
Divide the batter evenly.
Bake for 25–30 minutes.
Why it matters:
Even layers create a professional appearance.
Step 8: Cool Completely
Cool in pans briefly, then transfer to racks.
Common mistake:
Frosting warm cake.
Step 9: Make Buttercream
Beat butter until creamy.
Add cocoa.
Add powdered sugar gradually.
Add cream, vanilla, and salt.
Beat 4–5 minutes until fluffy.
Step 10: Assemble
Spread approximately 1 cup frosting between layers.
Apply crumb coat.
Chill for 20 minutes.
Finish frosting.
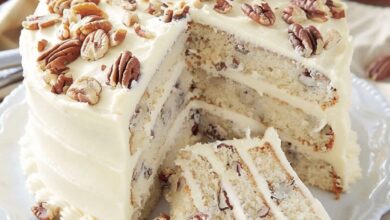
Create rustic spatula swirls across the sides and top exactly like the image.
Pro Tips
- Use room-temperature ingredients.
- Measure flour correctly.
- Cream the butter fully.
- Use quality vanilla.
- Do not overmix.
- Weigh batter for even layers.
- Cool completely.
- Chill crumb coat.
- Sift cocoa powder.
- Beat frosting until fluffy.
Common Mistakes To Avoid
- Overmixing batter.
- Using cold ingredients.
- Overbaking.
- Frosting warm layers.
- Skipping crumb coat.
- Uneven layer distribution.
- Adding powdered sugar too quickly.
Variations
Gluten-Free
Use a 1:1 gluten-free baking blend.
Dairy-Free
Use plant butter and dairy-free milk.
Low-Sugar
Reduce frosting sweetness by 15–20%.
High-Protein
Replace part of the flour with protein-enriched baking flour.
Storage Instructions
Refrigerator
Store covered up to 5 days.
Freezer
Freeze slices up to 3 months.
Reheating
Bring to room temperature before serving.
Make-Ahead Instructions
Bake layers 1–2 days ahead.
Wrap tightly and refrigerate.
Prepare frosting one day ahead.
Serving Suggestions
- Birthday parties
- Holiday gatherings
- Family celebrations
- Ice cream pairing
- Coffee service
Nutritional Notes
Contains dairy, eggs, wheat, and added sugars. Nutritional values vary depending on frosting thickness and serving size.
FAQ Section
Why is my vanilla cake dry?
Usually from overbaking or too much flour.
Can I make this cake ahead?
Yes. Bake layers up to two days ahead.
Can I freeze the cake?
Yes. Freeze whole or sliced for up to three months.
Why use buttermilk?
It adds moisture and tenderness.
Can I use store-bought frosting?
Yes, but homemade buttercream provides better flavor.
How do I get even cake layers?
Use a kitchen scale to divide the batter equally.
What frosting texture matches the image?
A thick, fluffy buttercream with rustic spatula swirls.
Key Takeaways
- Moist buttermilk vanilla cake
- Rich chocolate buttercream frosting
- Three-layer bakery-style presentation
- Perfect celebration dessert
- Beginner-friendly decorating technique
This vanilla layer cake with chocolate buttercream is a classic American celebration cake featuring three soft, buttery vanilla layers and rich cocoa frosting. Buttermilk and extra egg yolks create a moist crumb, while homemade chocolate buttercream delivers smooth texture and deep flavor. The cake is ideal for birthdays, holidays, and gatherings. A crumb coat and rustic spatula finish create a professional appearance without advanced decorating skills. Make layers ahead, store easily, and customize with gluten-free, dairy-free, or lower-sugar variations.